-
Paper Information
- Paper Submission
-
Journal Information
- About This Journal
- Editorial Board
- Current Issue
- Archive
- Author Guidelines
- Contact Us
International Journal of Textile Science
p-ISSN: 2325-0119 e-ISSN: 2325-0100
2013; 2(3): 41-48
doi:10.5923/j.textile.20130203.01
Effect of Various Parameters on Starting Mark in Woven Fabric
 Abstract
 Reference
 Full-Text PDF
 Full-text HTML
Engr. Reashad Bin Kabir, Engr. Md. Sadiqur Rahman
Lecturer, Dept. of Apparel Manufacturing Management & Technology, Shanto-Mariam University of Creative Technology
Correspondence to: Engr. Reashad Bin Kabir, Lecturer, Dept. of Apparel Manufacturing Management & Technology, Shanto-Mariam University of Creative Technology.
| Email: |  |
Copyright © 2012 Scientific & Academic Publishing. All Rights Reserved.
Starting mark is one of the major defects of woven fabric that occurred during weaving. Various parameters and conditions affect this Starting mark for which fabric quality is deteriorated. In this work the appropriate factors for the Starting mark in the different construction of the fabric have been investigated. Similar setting points can create different type of starting mark in different construction fabric. In this work it has been observed that heavy twill fabric has the tendency to create thick starting mark and loose plain fabrics may have the thin or open starting mark. Mechanical settings affect strongly on this starting mark than electrical settings do.
Keywords: Starting Mark, Back Rest Roller, Dropper Height, Warp Tension, Automatic Start Offset (ASO), Automatic Start Position (ASP)
Cite this paper: Engr. Reashad Bin Kabir, Engr. Md. Sadiqur Rahman, Effect of Various Parameters on Starting Mark in Woven Fabric, International Journal of Textile Science, Vol. 2 No. 3, 2013, pp. 41-48. doi: 10.5923/j.textile.20130203.01.
Article Outline
1. Introduction
- In weaving a planar structure is produced by interlacing two sets of yarns, fibers, roving’s, or filaments where the elements pass each other essentially at right angles and one set of elements is parallel to the fabric axis.During weaving different types of defects can be found in fabric but the common defects are as below: 1. Starting mark or loom bar, 2. Contamination, 3. Stain 4. Uneven lot mixing, 5. Starch mark, 6. Float,7. Double yarn, 8. Miss or running pick, 9. Hanging warp, 10. Loop Among all this faults loom bar or starting mark is most common fault. Due to this starting mark fabric is rejected in dyeing and printing. It creates a lot of problems in the fabric.
2. Aims & Object
- ØTo know the causes of the starting mark.ØTo know how to remove the starting mark.ØTo know the problem associated with starting mark in the fabric.ØTo analyse the different setting parameters (mechanical &electrical) those affect the starting mark.ØTo know how to change the setting parameters.ØTo know the effect of starting mark on different fabric construction.
3. Experimental
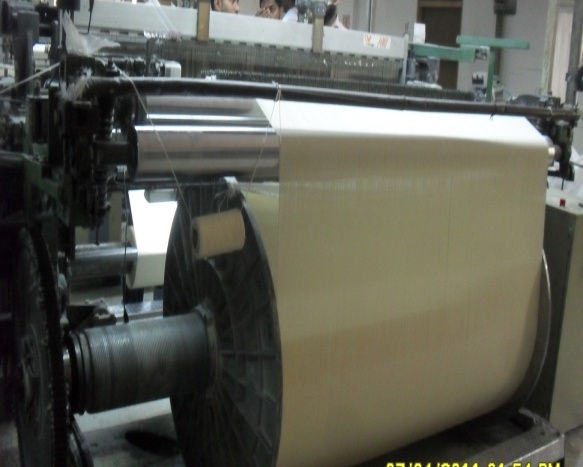
- The experimental work was conducted in 2011 In Sinha Yarn Dyeing & Fabrics Ltd, there are 86 air jet looms in the picanol section, in which of them were in full production. Various kinds of fabrics were being produced there like twill, plain fabric. Among these several looms were selected which were being running with different types & counts of yarn.
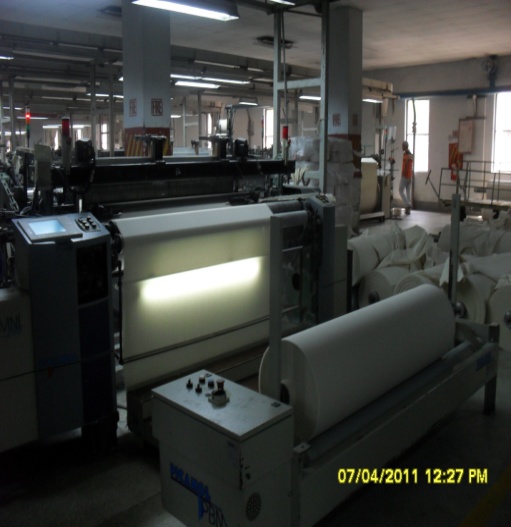 | Figure 1. Picanol Air Jet Loom |
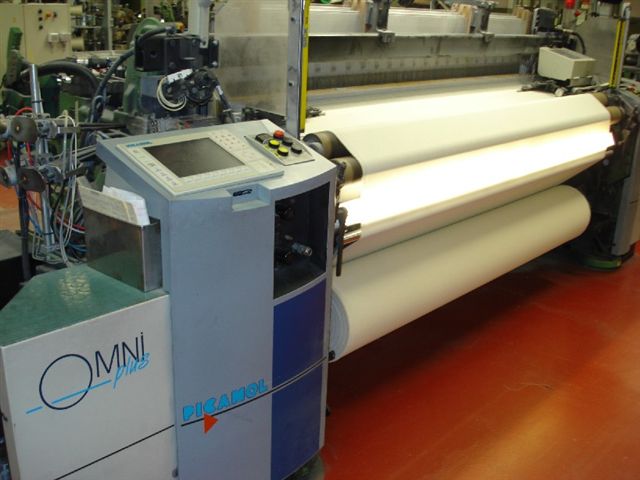 | Figure 2. Omni plus Picanol loom |
4. Theoretical Part
4.1. Starting Mark
- A band running across the full width of the cloth due to difference in appearance from its adjacent surface .This is a general term covering a number of specific defects as follow: Starting Mark, Pick Bar, Tension Bar or Shiner, Weft Bar.[1]Set marks are defined as fabric faults which occur when a loom is started after a stoppage. The definition applies to a variety of faults of this kind. For example, a set mark is "an isolated narrow bar running parallel with the picks, starting abruptly and gradually shading away to normal fabric. This is due to an abrupt change in the pick spacing followed by a gradual return to normal pick spacing. Such a bar may occur on restarting weaving after:-i. Pick findingii. Unweaving or pullback iii. Prolonged loom stoppage[2][3][4][5][6][7]These bars may be also referred to as start-up marks, setting on places, standing places or pullback places if the precise cause is known".[8]Start-up marks were first investigated by Greenwood and Cowhig (1956) who wrote a series of three papers. In the first paper a theoretical analysis of the factors governing pick was carried out as a part of an investigation into the problem of start-up marks. They derived and analyzed mathematical relationships between beat-up forces, cloth fell position, take-up rate and pick space.[9] This analysis was then extended to explain various causes of irregular pick spacing with reference to the effect of warp and fabric relaxation during loom stoppage. The effects of free length of warp and fabric as well as that of type of let-off motion on the severity of marks were also examined.[10] The third paper, an experimental investigation reports that the loom and warp investigated, the effect of loom speed was so small that slight variations in it, either during running or after staring up, did not cause any appreciable irregularity in the pick spacing. It was also concluded that the main cause of start-up marks is the relaxations of warp and cloth.[11] According to Inui (1968,1969), deviation of warp tension during first picks (after restarting ) from that in the steady running state is the most important cause of start-up marks. He also observed that the variation in warp tension was related to the inertia of the oscillating backrest.[12]
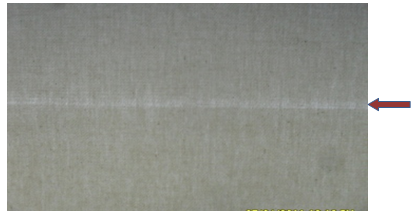 | Figure 3. loom bar or starting mark (thick or dense mark) |
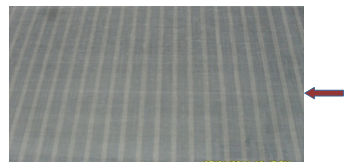 | Figure 4. loom bar or starting mark (open mark) |
4.2. Reasons
- 1. When a loom stops as a result of weft breakage, the loom is turned over to that shed opening containing the broken weft, and during this turning over of the loom, the reed is caused to strike the fell of the fabric. The reed’s striking of the fell during this turning over of the loom has a take up is higher than let off and sometimes let off is higher than take up. Usually this is come due to improper warp tension. When machine is stopped tension on warp yarn is relaxed then difference between take up and let off may occur. Again when machine is stopped for several times then elasticity of the yarn may also change. So more yarn is gathered together and result starting mark.[19]2. Improper ratio of take up and let off, sometimes take up is higher than let off and sometimes let off is higher than take up. Usually this is come due to improper warp tension. When machine is stopped tension on warp yarn is relaxed then difference between take up and let off may occur. Again when machine is stopped for several times then elasticity of the yarn may also change. So more yarn is gathered together and result starting mark.3. Machine stoppage for long time.4. Back rest roller position.5. Different settings of microprocessor.6. Drop wire height and position of drop wire. 7. Position of reed according to weaving cycle.8. Due to different pick spacing.9. Beam collars are loose, cracked, broken, or bent beam.
4.3. Remedies
4.3.1. Modern System
- When a loom stops as a result of a weft break, the start mark preventer is adapted to be pre-set so that the fell can be moved forwardly of the reed beat-up position a pre-selected distance to meet the requirements of a particular type of fabric when the loom is turned over to the shed opening containing the broken pick. After removal of the broken pick of weft, the device is again actuated and the fell is caused to return to precise position whereat weaving can be resumed without creating a start mark in the fabric.[19]1. By ensuring the proper ratio between the take up and let off. This can be ensured by maintaining proper tension on warp yarn. Not only that we should also use good quality yarn which have sufficient amount of elasticity.2. By minimizing the longer machine stoppage time.3. Back rest roller should be positioned properly so that any kind of loom bar or starting mark may be avoided.4. Tension on warp yarn should be maintained properly.5. By adjusting the proper setting of microprocessor, so that loom bar or starting mark can be avoided.6. Drop wire height and position should be maintained properly to avoid starting mark.7. By maintaining proper reed angle at starting and stopping position.8. Fabric construction should be analysed properly and set according to the loom settings so that loom bar is avoided.9. Proper pick space must be maintained.10. Beam collars should be tight enough, cracked, broken beam should not use.
4.3.2. Manual and Conventional System
- In the past days an improved start mark preventer for looms formed by a manually operable device including a double armed lever having a control handle mounted on one arm and a control pawl on the other arm. The control pawl is disposed in operative engagement with the loom’s ratchet wheel which rotates its take-up roll by means of a feed pawl and hold-back pawl. The device includes a guide for control handle with selectively position able stop members that provide a neutral, first and second positions for the handle. Movement of the handle to the first position moves the fell forwardly of the of the reed’s beat-up positions, in the second position the fell is permitted to return to its initial position and upon starting the loom the control handle will automatically move to its neutral position.
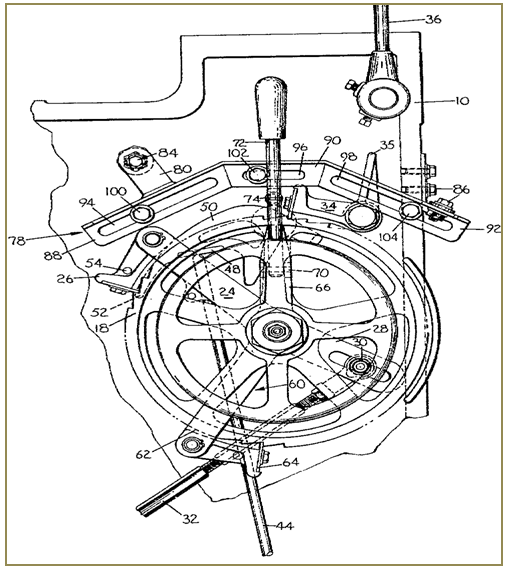 | Figure 5. Conventional loom with manual double armed lever |
4.4. Problems Arise due to Loom Bar
- 1. Appearance of the fabric may be changed. 2. Excess amount of starting mark or loom bar may lead the rejection of the fabric.3. Excess amount of loom bar may increase wastage.4. Loom bar or starting mark mainly create problem in dyeing and printing. Where these mark visible in those place shade variation may occur.5. Loom bar or starting mark minimizes the quality of the fabric.
4.5. Setting Points of Loom and Different Parameters
4.5.1. Stoppage Time
- During running of the machine the tension of warp yarn is maintained at a constant rate but during stoppage the warp yarn become relaxed so the constant tension of warp yarn may be changed. That’s how starting mark may appear.
4.5.2. Back Rest Roller
- Back rest roller height is one of the most important setting for loom bar or starting mark. Depending on the height of the back rest roller the angle of warp passage is changed, as a result tension of the warp is changed so loom bar or starting mark may come. But we cannot say that which height should be given. This may depends on fabric construction and other parameters. It is important to find out the exact height of the back rest roller to avoid starting mark or loom bar.
 | Figure 6. Back Rest Roller |
4.5.3. Shed Depth
- By changing the depth of the shed the tension of the warp yarn can vary and due to this starting mark may appear. Sometimes smaller shed is preferable for avoiding the loom bar and some times larger depth of shed is preferable to avoid starting mark or loom bar.
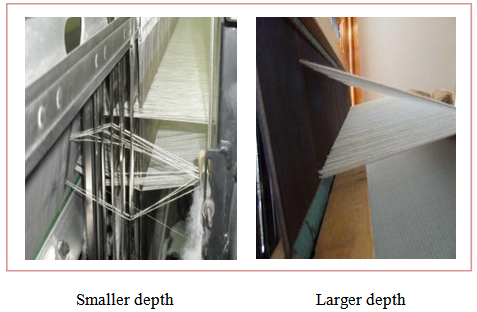 | Figure 7. Depth of Shed |
4.5.4. Drop Wire
- By changing drop wire position the warp thread angle may change, as a result tension of the warp also change which may lead starting mark.
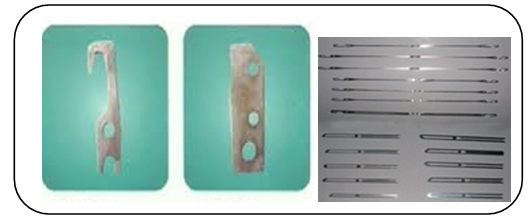 | Figure 8. Different types of Drop Wire |
4.5.5. Electrical Settings
- In electrical settings the change is done by micro processor. There are two main settings named ASO, ASP.
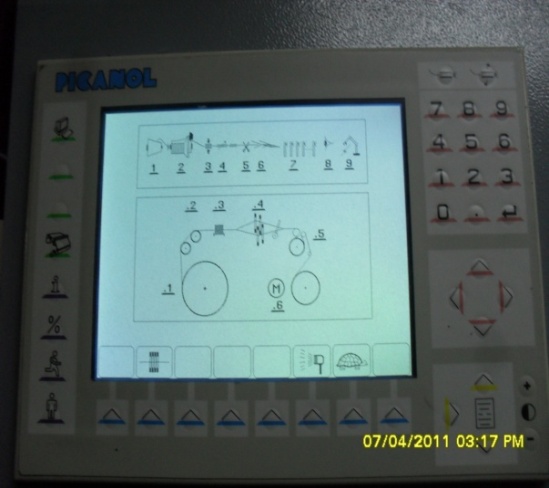 | Figure 9. Monitor for electrical setting change |
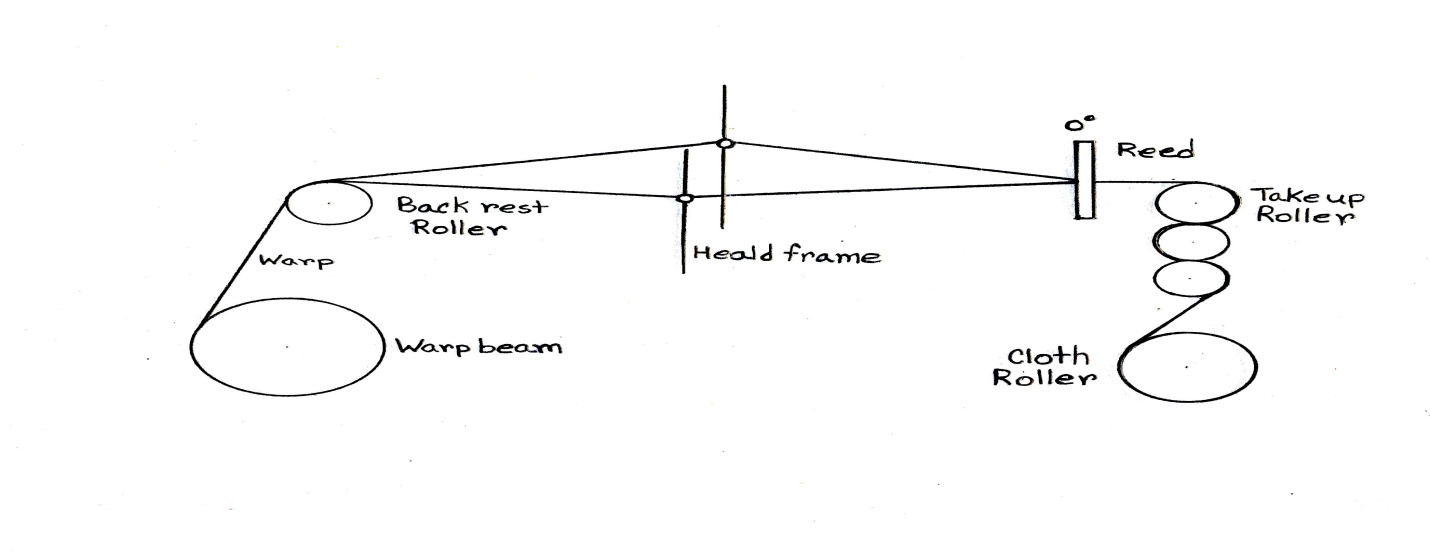 | Figure 10. Position of reed at 0° |
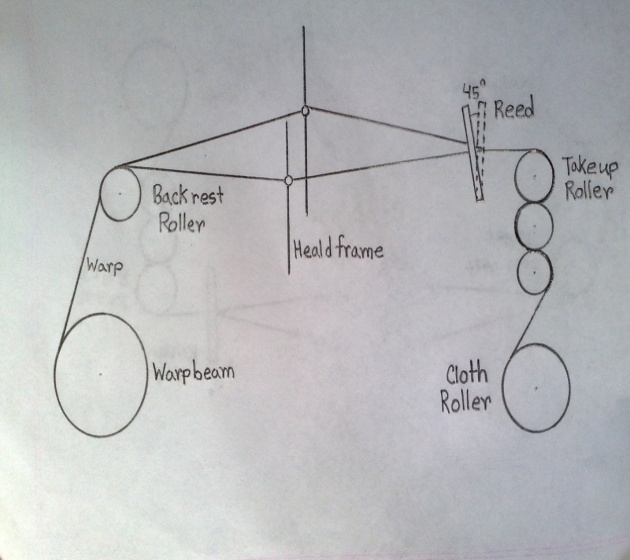 | Figure 11. Position of reed at 45° |
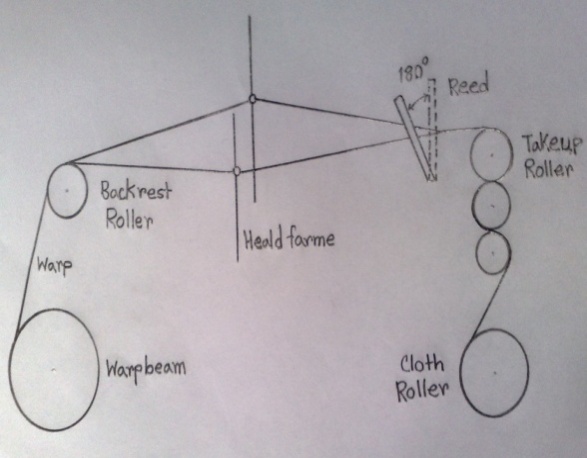 | Figure 12. Position of reed at 180° |
5. Practical Part
5.1. Machine and Fabric Specification
5.1.1. Machine No: 1
- RPM: 550 Total Ends: 6528Reed No: 1058 DM (4 ends per dent)Warp Tension: 3.75 KNGrey Width: 60 inchFabric Construction:( 20 X 14) / (116 X 60)[3/1‘s’ twill]
5.1.1. Machine No: 2
- RPM: 600Total Ends: 4188Reed No: 120/1Warp Tension: 1.2 KNGrey Width: 67 inchFabric Construction: ( 40 X 40) / (72 X 68)[3/1 Plain]
5.2. Working Procedure
5.2.1. Electrical Settings
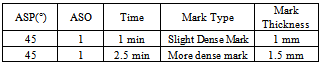
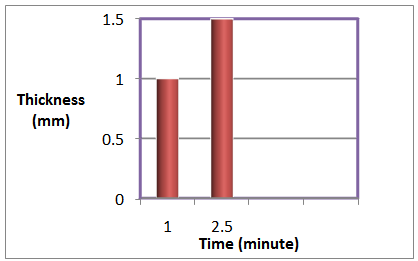
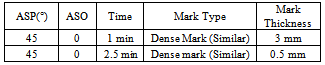
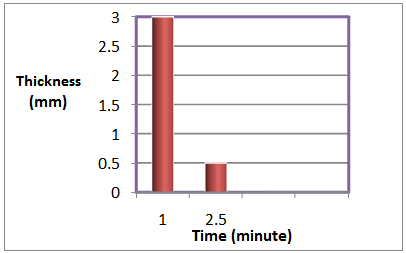
- For electrical settings all the necessary work can be done by giving instructions on the monitor. In this project work mainly 3 parameters, Automatic Start Position (ASP), Automatic Start Offset (ASO) and Time were changed. For warp stoppage some data was taken by changing the ASO value and the Time. Every time the changed parameters were written down on the fabric. This was done several times by changing the ASO value and Time.
5.2.2. Mechanical Settings
- In this project 2 different types of fabric were used. One of these was twill and another one was plain. Only back rest roller height was changed. The changing of the height was completely mechanical. By loosening 4 bolts the height can be changed and after changing the bolts were again tightened. It was time consuming. After changing the back rest roller height again several data were taken. In different settings looms were stopped manually and cloth was marked by writing the data on fabric. During production that marks were reached below the take up roller. There were two tube lights beside the take up roller so the marks could be examined easily whether it contained loom bar or not. The marks again were checked after cutting the fabric piece from the loom and thickness of loom bar was determined by normal scale.
5.3. Obtained Data
- All the data obtained was tabulated and graphically shown below
5.3.1. Loom Settings:-1
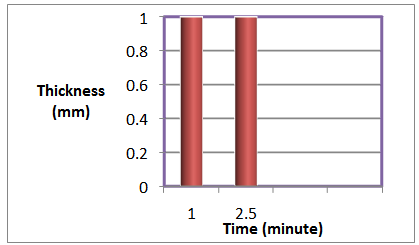
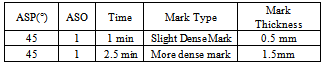
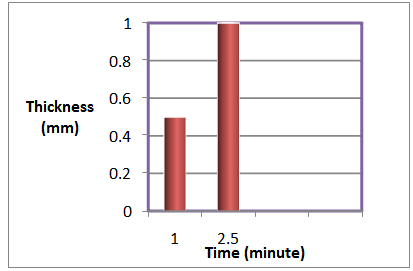
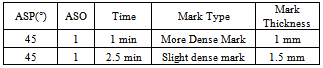
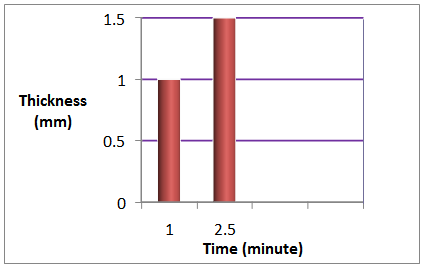
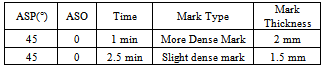
- For 3/1 ’S’ Twill FabricBack Rest Height: 12Dropper Height : 4Warp Tension: 3.75 KNRPM: 550Total Ends: 6528Reed No: 1058 DM (4 ends per dent)Grey Width: 60 inchFabric Construction:( 20 X 14) / (116 X 60)[3/1‘s’ twill]
|
 | Graph 1. Time Vs Thickness |
|
 | Graph 2. Time Vs Thickness |
|

 | Graph 3. Time Vs Thickness |
|
 | Graph 4. Time Vs Thickness |
5.3.2. Loom Settings:-2
- For 3/1 ’S’ Twill FabricBack Rest Height: 9Dropper Height : 4Warp Tension: 3.75 KNRPM: 550Total Ends: 6528Reed No: 1058 DM (4 ends per dent)Grey Width: 60 inchFabric Construction:( 20 X 14) / (116 X 60)[3/1‘s’ twill]
|
 | Graph 5. Time Vs Thickness |
|
 | Graph 6. Time Vs Thickness |
|

 | Graph 7. Time Vs Thickness |
|
 | Graph 8. Time Vs Thickness |
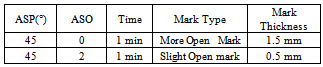
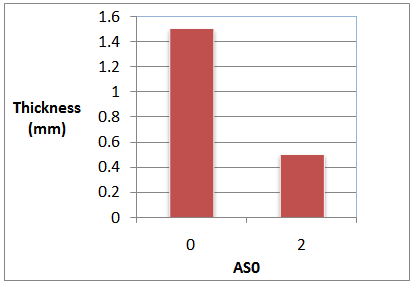
5.3.3. Loom Settings:-3
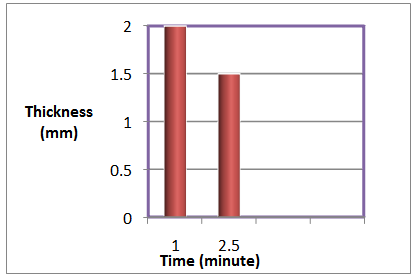
- For 1/1 Plain FabricBack Rest Height: 8Dropper Height : 4Warp Tension: 1.2 KNRPM: 600Total Ends: 4188Reed No: 120/1Grey Width: 67 inchFabric Construction: :( 40 X 40) / (72 X 68)[3/1 Plain]
|
 | Graph 9. ASO Vs Thickness |
|
 | Graph 10. ASO Vs Thickness |
6. Analysis & Findings
6.1. Analysis
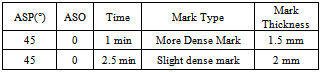
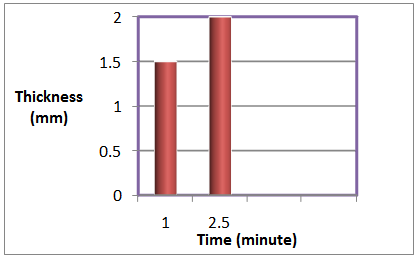
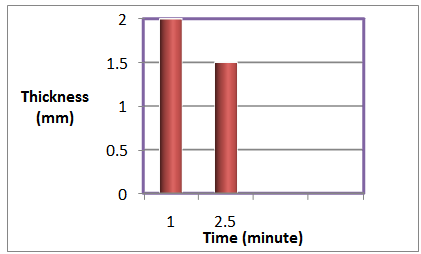
- a) According to table 1, table 4 and table 6, when the loom was stopped then warp tension was released from the yarn, so yarn become relaxed. As loom was stopped for long time the yarn will be relaxed more, although slow beat up is applied but that was not enough to maintain the proper tension on yarn, so cloth fell moved backward, as a result thick or dense mark is visible. b) According to the table 1 and table 3, the setting for ASP was 45° and time was 2.5 minutes and in both cases thick or dense marks were visible but in table-1 ASO was 1 and in table-3 ASO was 0, but more dense mark was visible in the fabric according to table-3 settings. This was happened because according to table-3 settings only 1 slow beat up was applied so take up was not enough and fabric did not move forward enough as a result more length of fabric gathered in a certain place (cloth fell), so more thick or dense mark occurred than in table-1.c) According to table-2, table-7, table-8 more dense marks occurred in fabric when loom was stopped for less time .This completely reversed result than others.d) The construction of plain fabric which was used in the project work was light and EPI and PPI were not compact. So warp tension was very much less than that in twill fabric. In case of loom stoppage take up tension is more than warp tension. So during stoppage time fabric moved forward and then cloth fell also moved forward and open mark occurred.e) In the table 9 complex results have been gained. May be this was happened due to unusual tension variation. In ASO 0 open mark occurred in normal way. When ASO was 1, reed strokes the fell twice so fabric moved forward at more amounts so more thickness of open mark occurred. But when ASO 2 was applied, it was supposed to create more thickness of open mark than ASO 1 did. But the thickness of that open mark showed equal to that in ASO 0.May be due to 3 beat up fabric might slip from the temple which created a backward movement of cloth, Thus thickness of open mark decreased.
6.1. Findings
- 1. Dense mark occurs in heavy twill fabric where as open mark occurs in light plain fabric.2. More stoppage time, more thickness of open or dense marks though few inverse results were also obtained and for the explanation of this a further research is required.3. Mechanical settings affect the loom bar more than electrical settings.
7. Conclusions
- Certain setting parameters are not suitable for all construction of the fabric. By changing back rest height, electrical settings etc loom bar problem can be solved. So before running looms the appropriate setting parameters must be specified for a certain loom. Once the quality fabric is produced then the setting specifications can be applied for that construction and loom in the next time easily. So the parameters should be written, apply and thus loom bar defect can be solved.