S. Sattari , H. Bisadi , M. Sajed
Faculty of mechanical engineering, Iran University of science and technology, Tehran, Iran
Correspondence to: S. Sattari , Faculty of mechanical engineering, Iran University of science and technology, Tehran, Iran.
| Email: |  |
Copyright © 2012 Scientific & Academic Publishing. All Rights Reserved.
Abstract
Thin sheets welding are a complicated process either in conventional or newly developed methods. In this approach friction stir welded (FSW), 0.8mm in thickness 5083 aluminium sheets have been studied. A special fixture, designed for ultra-thin sheets, and a simple cylindrical tool, was used. Tensile test and micro hardness test was investigated. All tested samples are defects free. Mechanical properties show that yield stress off old samples are below the base metal and by increasing in speed ratio (w/v) the average of micro hardness was decreased. Samples were welded at speed ratio range of 18.58 to 34.84 have the best quality of tensile test and micro hardness. Temperature measurement during welding indicate that 430 0C to 510 0C is the best temperature range for defect free joints. Fracture surface analyzed using scanning electron microscope (SEM) which represented Dimpled rupture at defect free joints.
Keywords:
Friction Stir Welding, Ultra Thin Sheets, Mechanical Properties, Micro Hardness, Temperature Distributions
Cite this paper:
S. Sattari , H. Bisadi , M. Sajed , "Mechanical Properties and Temperature Distributions of Thin Friction Stir Welded Sheets of AA5083", International Journal of Mechanics and Applications, Vol. 2 No. 1, 2012, pp. 1-6. doi: 10.5923/j.mechanics.20120201.01.
1. Introduction
Because of physical properties of aluminium such as high thermal expansion coefficient, high heat transfer, specific heat and high electrical transfer; fusion welding processes are not suitable for aluminium alloys. High thermal expansion coefficient results deformation during fusion welding. Because of high heat transfer of aluminium we cannot use laser welding and because of high electrical transfer using of resistant welding that heat produced with electrical resistances is restricted.Friction stir welding introduced itself as a marvellous process to join metals which have low melting point especially aluminium. FSW is a newly developed process that was recorded in 1991 at TWI.[1] At this process a rotating non-consuming tool with feeding in welding direction results in joining between two separate parts. With tool rotation and its contact with part surface heat is generated then, in pin vicinity, yield strength falls and formability increases. On the other hand with linear motion of tool materials which are in moving direction moved to the back of tool and joining obtained.[2,3] researches show that 86% of heat needed to reach plasticity obtained from friction between tool shoulder and part surface and the rest of that generated in result of plastic strain and friction of pin and part[4]. Fig1 show Schematic of friction stir welding process.In this process there are 4 different zones and metallurgical properties of these zones are quite different. Grain size and grain boundaries direction of this zones are different with base metal. Grain sizes are finer than base metal. The finest in grain size are the stir zone and in that zone boundaries have some perceptions that cause to increasing of micro hardness of stir zone.Generated heat and mechanical work results different welding zone in FSW compared with fusion methods At firs P.L. Threadgill as a first one divided this into four different zones:[5]Parent metal (PM): where material not deformed, also may be subjected to thermal cycles but there is no micro-structural or mechanical change.Heat affected zone (HAZ): in this zone microstructure and mechanical properties change because of thermal cycles. Mahuti describes HAZ as a zone that is subjected to temperature more than 250 °C which will affect precipitations.[6]Thermo-mechanical affected zone (TMAZ): in this zone material not only is subjected to thermal cycles but also deformed plastically, microstructure is extremely deformed. Parent metal grains are stretched upward in direction of material flow in the welding zone. Also this zone is subjected to plastic deformation but because there is no enough plastic strain, there is no recrystallization.Stir zone (SZ): where recrystallization completely occurred. In this zone because of sever deformation at high temperature fine grain size can be seen which increases strength and hardness of welded metal. These zones are shown in Fig1.Many researchers have tried joining thick plates but because of some problems joining of ultra-thin plates have few researches; done about plates with thickness less than 1 mm. A. Scilapi is the first one who did this which is known as μFSW. He used 0.8 mm thickness plates and reported that tensile tests indicate that strength at welding zone is 90% of parent metal and failure occur at welding zone because of thinness occurring in this zone.[9] In addition to thinning, plates separation from fixture during welding and Lack of heat because of high heat conduction are other problems in μFSW.[13] In this approach mechanical and metallurgical properties of friction stir welded ultra-thin plates are investigated.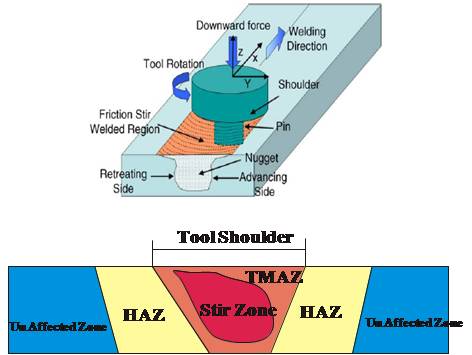 | Figure 1. Schematic of friction stir welding process |
2. Experimental Method
10*20*0.8 mm AA5083-H323 sheets are used in this investigation. Chemical composition of AA5083 is listed in Table1. Welding is done in direction of rolling. Tool material is H13 with 2mm simple pin diameter and 6mm shoulder diameter and 0.65mm pin height which is heat treated to reach 52HRC.[5] Tool is mounted on milling machine with 3 degree oblique in opposite direction of welding. To have defect free joint and to avoid sheets separation from fixture a roll employed which moves in front of tool and is shown in Fig 2 Because of high heat conduction rate in ultra-thin plates and lack of enough heat for welding, was used a heat resistant plate under aluminium sheets. Welding process performed in 5 tool rotation speeds and 2 feeding rates are listed in Table2. Tensile test samples prepared according ASTM-E8.Fig3| Table 1. Chemical composition of Al 5083 |
| | Element | Si | Fe | Cu | Mn | Mg | Cr | Zn | Ti | | % Present | 0.1 | 0.3 | 0.05 | 0.6 | 4.3 | 0.2 | 0.02 | 0.25 |
|
|
| Table 2. Welding parameters |
| | | Rotation(RPM) | Travel (mm/min) | Speed Ratio (ω/v) | | Fsw1 | 600 | 32 | 18.75 | | Fsw2 | 600 | 60 | 10 | | Fsw3 | 900 | 32 | 28.125 | | Fsw4 | 900 | 60 | 15 | | Fsw5 | 1115 | 32 | 34.84 | | Fsw6 | 1115 | 60 | 18.58 |
|
|
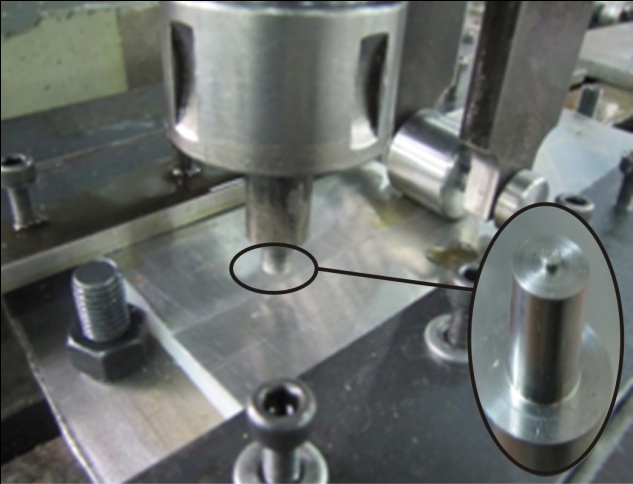 | Figure 2. The fixture of ultra thin weld |
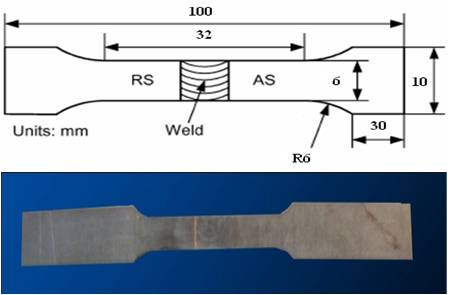 | Figure 3. Tensile test sample prepared according ASTM-E8 |
Micro-hardness recorded using Vickers hardness (HV) and 200gr load. Measured points distance from each other is 0.5 mm at SZ and 1 mm at other zones. Part temperature during welding recorded. For this K-Type heat sensors were used. Temperature recorded at 5 points. Input signal is A2D voltage that amplified at first then converted to digital signal and using serial port transferred to a computer and were recorded. After elimination of false data that recorded due to noise of sample vibration during process, the 5 point thermal history versus time is available. The layout of heat sensors is shown at Fig 5. 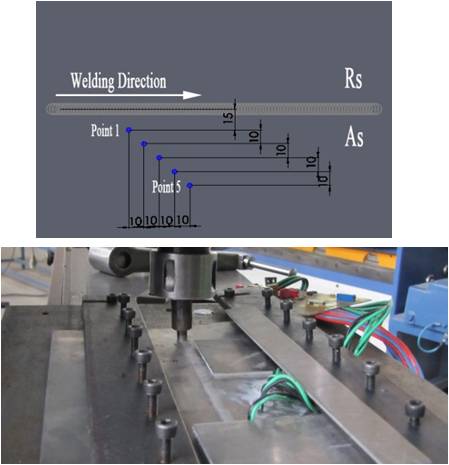 | Figure 5. Layout of heat sensors |
3. Results and Discussion
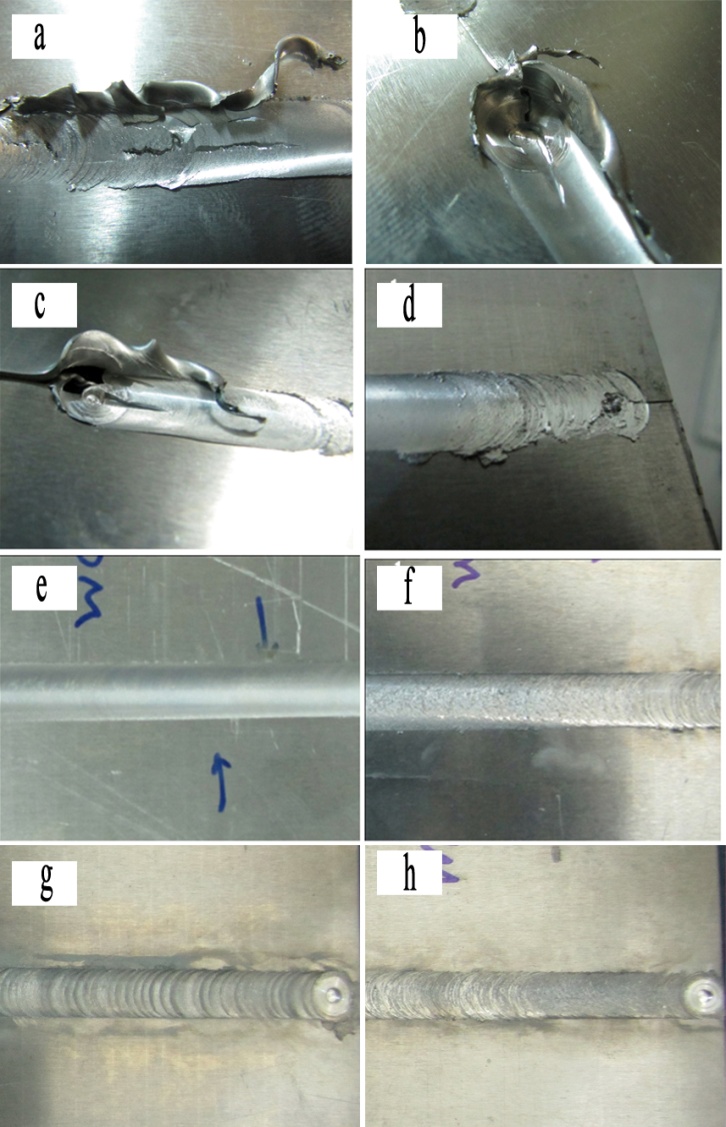
In ultra-thin plates welding, in addition to other defects, main problems are lack of enough heat because of high heat conductivity and sheets separation from fixture. Heat is not enough not because of small tool shoulder or incomplete contact between shoulder and plates, it is because of high heat conductivity of aluminium which becomes higher because of low thickness of ultrathin plates. This problem can be solved using a resistant plate under main plates. When tool feeds towards the part of plates which are in front of tool leave fixture surface and scroll around tool and rupture occurred. For this problem one can use clamps closely together also a roll which moves in front of tool and prevents sheets to go upward can be used. Another problem is welding zone thinning that occurred in welding zone which is a reason of rupture in welding zone during tensile test and cannot be prevented; in literature it is indicated that welding zone yield strength is 90% of parent metal[6]. Fig 4 shows some of these defects. | Figure 4. Welding defects and defect free welded ultra-thin plates. a) defect look like tunnel defect at thick plates b) defect caused by low temperature and low material flow c) plates separation from fixture surface d) sheets are not heated enough during welding e) welding surface at 1115 rpm and 32 mm/min f) welding surface at 600 rpm and 60 mm/min g)welding surface at 900 rpm and 60 mm/min h) welding surface at 900 rpm and 32 mm/min |
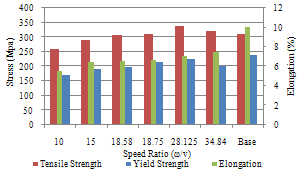
Fig6 shows engineering stress-strain diagram of parent metal and samples. Fig 7 indicates that yielding stress for all samples is less than parent metal. Tensile strength of welded samples in 10 to 28.125 ranges increased to 337 MPa that is a bit more than parent metal. In low speed rates (10 to 15) welding tensile strength is lower than parent metal also after 15 with increase in speed rate results too tensile strength increasing and in 28.125 it reaches to its pick and becomes more than parent metal. After 10, as a speed rate, thermal input increases and elongation becomes 7.15%, as maximum, which is 70% of parent metal elongation. Figure6 shows that yield strength of welded samples are less than parent metal and variation regime of that is similar to tensile strength. Samples with 900 rpm and 32 mm/min parameters achieve highest tensile and yield strength, the yield strength for this samples is 220MPa which is 95% of parent metal yield strength. Literature confirmed this reduction in yield strength of welded samples compared with parent metal[6-8].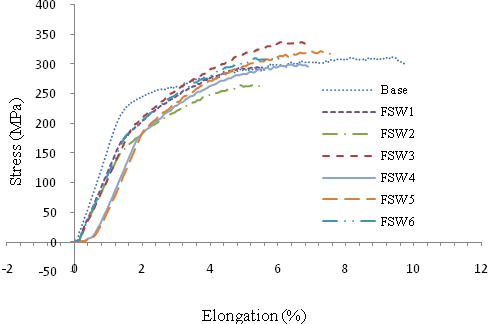 | Figure 6. Engineering stress-strain diagram of parent metal and all of samples |
 | Figure 7. Mechanical properties of welded samples with various parameters and base metal |
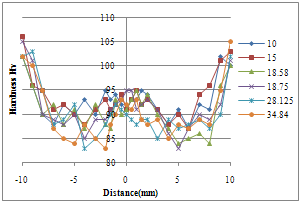
It should be said that unlike literature tool rotation speed increasing at FSW does not lead to better mechanical properties. Arbegast researches indicate that, tool rotation speed increasing results higher thermal index. Tool rotation speed affects the temperature more than feed rate. Thermal increase, because of friction, results bigger HAZ zone and some zones with precipitation and other without precipitation, particle free zone (PFZ), this kind of distribution cannot result strength increasing which is confirmed with Tensile tests[9].Fig8 show that increase in speed rate results decrease in hardness. Also micro-hardness profile at Fig 9 indicate that hardness at SZ is more than other zones and far from centre joint line at TMAZ and its boundary with HAZ hardness decrease, in both RS and AS, and after that increase till parent metal hardness[18]. TMAZ and its boundary with HAZ have minimum hardness, i.e. the zone where defect free joints fail in tensile test. The average hardness decrease with speed rate increasing; it is because of softening take place at SZ. It can be said that heat input increase during welding results hardness decreasing. Rotating speed is more effective than feed rate in this case. Friction stir welding is caused to decreasing of the displacement density and decreasing in that cause to decreasing of the micro hardness. In this process tool rotation and feed rate cause to dynamic recristallization and dynamic recristallization cause to new grain giant.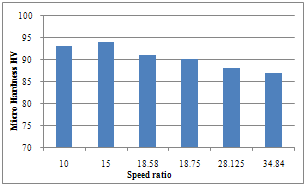 | Figure 8. Average hardness of welded samples versus speed rate |
 | Figure 9. Micro-hardness profile of welded samples |
The highest temperature that samples get and duration of being at high temperatures are important factors that affect friction welding. According to Hashimoto: speed rate increasing results higher maximum sample temperature.[10] Arbegast defined (ω2/v) as a pseudo heat index, using experimental view, and discussed effect of that on input heat. Following equation indicates the relation between maximum temperature and FSW main parameters for aluminium alloys:Where α differs between 0.04 and 0.06 and K differs between 0.65 and 0.75 and Tm is the alloy melt point in centigrade.[9]Fig 10 show the temperature distribution during friction stir welding process. Using decreasing regime of measured temperature one can find the maximum temperature at nugget with in good precision. The maximum temperature 15 mm far from centre of weld is 470 0C which is recorded at 2500 rpm rotation speed and 30 mm/min feed rate, this temperature for the weld centre is 515 and minimum temperature is 322 0C which is recorded at 600 rpm tool rotation speed and 60 mm/min feed rate, this temperature for weld centre is 360 0C.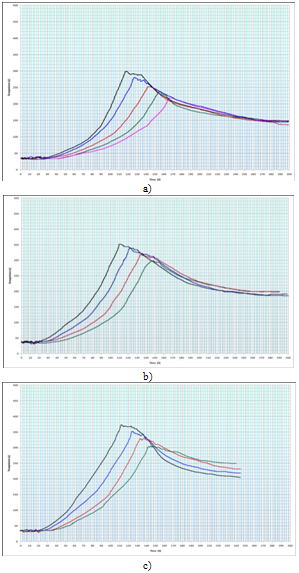 | Figure 10. Thermal history of welding process at a) 600 rpm and 60 mm/min b) 900 rpm and 60 mm/min c)1115rpm and 60 mm/min |
Fig 11 shows the effect of rotation speed and feed ratio on maximum temperature on weld zone. With an almost doubling of the rotation speed (form 600rpm to 1115rpm) we can see maximum temperature 40 0C rise and with almost half of feed ratio can seen maximum temperature 290C is reduced. And this shows the efficiency of rotation speed on temperature.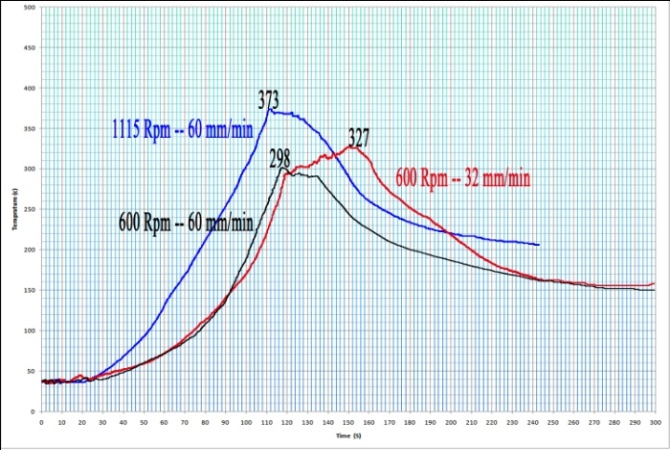 | Figure 11. Effect of rotation speed and feed ration on maximum temperature |
For studying different tensile properties different speed rates, ruptured samples investigated using SEM images then failed zones identified and failed surfaces analysed. There is two kind of rupture 1. Rupture in stir zone 2. Rupture in RS zone.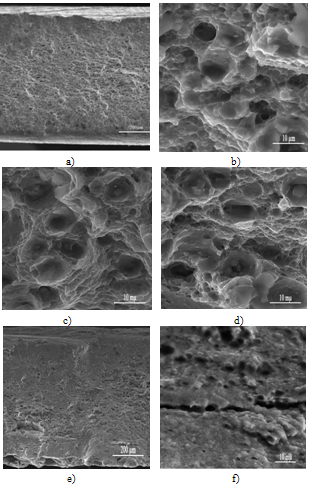 | Figure 12. SEM image of failure surface a) at ω/v = 18.58 b) at ω/v = 28.125 c) non-dimpled surface at ω/v = 15 d) micro defects in RS zone at ω/v = 15 |
Samples that are failed in SZ have non dimpled surfaces. The main fracture mechanism at this alloy is Dimply rupture. This mechanism acts with particle or their boundary fracture and voids Coalescence. Defects always create stress concentration during tensile[11,12]. Samples that are welded in range (ω/v) 18.58 to 34.84 failed in RS zone and others failed in SZ. Samples which failed in RS have dimpled ruptured surface that confirmed joints are defect free Fig 12(a to d). All samples failed at 45 degree and microstructure images and also N.T. kumbhar´s data indicate that the failure is ductile Samples that are welded in speed rate less than 18.58 have microscopic defects. Literature indicates that this defect occurs because of the same reason that tunnel defect occurs but the difference is that in this manner voids that produced because of incomplete stirring are not gathering together to produce a tunnel which can be seen in primary investigations. Obviously this defect occurs because of too feed rate of tool during welding[13]. On the other hand Guerra showed that material flow under pin, vortex swirl zone, is lowest compared to its vicinity. Pin distance from back of plates and too feed rate are the main causes of low material flow at vortex swirl zone[14].Fig 10(e, f)
4. Conclusions
The main results of this investigation are:1. With speed rate decreasing microscopic defects may increase and with increasing of this rate up to 28.125 better mechanical properties achieved for Al 5083.2. Failure at defect free friction stir welded Al 5083 sheets are Dimply kind and at the speed rate out of 18.58 to 34.84 range some defects like tunnel one may be seen3. The best welding results in terms of mechanical and failure properties are in the 18.58 to 34.84 speed rate range.4. Increase in speed rate results more heat input. In this case tool rotation speed is more effective than feed rate. Defect free welds achieved between 430 0C and 510 0C. And any increase in inputting heat results decrease in hardness of welding zone.
References
| [1] | Thomas WM, Nicholas ED, Needham JC, Murch MG, Templesmith P, Dawes CJ , International Patent Application, No. PCT/GB92/ 02203 |
| [2] | R.S. Mishra, 2005, Friction Stir Welding And Processing, Materials Science and Engineering R, 50, 1–78 |
| [3] | M.Peel, 2003, Microstructure mechanical properties and residual stresses as a function of welding speed in aluminum AA5083 friction stir welds, Acta Materialia, 51,4791-4801 |
| [4] | H Schmidt, J Hattel and J Wert, 2004, An analytical model for the heat generation in friction stir welding, Modelling Simul. Mater. Sci. Eng. 12, 143–157 |
| [5] | ASM metals handbook, Heat treating, Vol. 4, pp-1544-1562 |
| [6] | A. Scialpi , M. De Giorgi , L.A.C. De Filippis , R. Nobile, F.W. Panella , 2009, Mechanical analysis of ultra-thin friction stir welding joined sheets with dissimilar and similar materials,Materials and Design 29, 124-132 |
| [7] | M.peel, A.steuwer, M.Preuss, P.J.Withers, 2003, Microstructure, mechanical properties and residual stresses as a function of welding speed in aluminium AA5083 friction stir welds, Acta Materialia 51, 4791-4801 |
| [8] | Yong-Jai KWON, Seong-Beom SHIM, Dong-Hwan PARK, 2009, Friction stir welding of 5052 aluminum alloy plates, Trans.Nonferrius Met. Soc. China 19, 23-27 |
| [9] | N.T. Kumbhar, S.K. Sahoo, I. Samajdar, G.K. Dey, K. Bhanumurthy, 2011, Microstructure and microtextural studies of friction stir welded aluminum alloy 5052, Materials and Design 32, 1657–1666 |
| [10] | M.W. Mahoney, C.G. Rhodes, J.G. Flintoff, Properties of friction-stir welded 7075 T651 aluminum, Metallurgical and Material Transactions A, 29,(1998), pp. 1955-1964 |
| [11] | R.M. Leala, C. Leitao, A. Loureiro, D.M. Rodrigues, P. Vilac¸ Material flow in heterogeneous friction stir welding of thin aluminium sheets: Effect of shoulder geometry, Materials Science and Engineering A 498 (2008) 384–391 |
| [12] | ASM metals handbook, Heat treating, Vol. 4, pp-1544-1562 |
| [13] | H.J. Liu, H. Fujii, M. Maeda, K. Nogi, Tensile properties and fracture locations of friction-stir-welded joints of 2017-T351 aluminum alloy, Journal of Materials Processing Technology, Vol.142, (2003), pp. 692–696 |
| [14] | M. Guerra, C. Schmidt, J.C. McClure, L.E. Murr, A.C. Nunes, Flow patterns during friction stir welding, Materials Characterization, 49, (2003), pp. 95– 101 |


 Abstract
 Reference
 Full-Text PDF
 Full-Text HTML