-
Paper Information
- Next Paper
- Previous Paper
- Paper Submission
-
Journal Information
- About This Journal
- Editorial Board
- Current Issue
- Archive
- Author Guidelines
- Contact Us
American Journal of Materials Science
p-ISSN: 2162-9382 e-ISSN: 2162-8424
2012; 2(1): 14-21
doi:10.5923/j.materials.20120201.03
Dimensional and Geometric Deviations Induced by Milling of Annealed and Hardened AISI H13 Tool Steel
José Luiz S. Ribeiro1, Steve B. Diniz2, Juan Carlos Campos Rubio2, Alexandre M. Abrão2
1Department of Mechatronic Engineering, Polytechnic Institute, Pontifical Catholic University of Minas Gerais, Av. Dom José Gaspar, 500 , Coração Eucarístico, Belo Horizonte MG, CEP: 30535-610, Brazil
2Department of Mechanical Engineering, Universidade Federal de Minas Gerais, Av. Antônio Carlos, 6627 , Pampulha, Belo Horizonte MG, CEP: 31.270-901, Brazil
Correspondence to: Alexandre M. Abrão, Department of Mechanical Engineering, Universidade Federal de Minas Gerais, Av. Antônio Carlos, 6627 , Pampulha, Belo Horizonte MG, CEP: 31.270-901, Brazil.
| Email: |  |
Copyright © 2012 Scientific & Academic Publishing. All Rights Reserved.
The principal goal of this paper was to investigate the influence of tool grade, cutting speed and feed rate on the dimensional (length, diameter and radius) and geometric (parallelism and angularity) deviations obtained after milling AISI H13 hot work die steel in both annealed and hardened conditions using three indexable insert grades: two coated tungsten carbides tools and one cermet tool. The results indicated that lower dimensional deviations were obtained for the external features when up-milling the softer material. Tool grade did not seem to drastically affect external dimensional errors. The dimensional deviations for the internal features were lower when up-milling the hardened steel. The cermet tool was responsible for tighter tolerances when milling the annealed steel, whereas the PVD-coated tungsten carbide tool gave the best results when machining the hardened steel. The parallelism results indicated that tighter tolerances were obtained when milling with the PVD-coated carbide tool. Finally, the angular deviation was lower when down-milling the annealed material with the cermet tool.
Keywords: Milling, Tool Steel, Dimensional Deviation, Geometric Deviations
Cite this paper: José Luiz S. Ribeiro, Steve B. Diniz, Juan Carlos Campos Rubio, Alexandre M. Abrão, Dimensional and Geometric Deviations Induced by Milling of Annealed and Hardened AISI H13 Tool Steel, American Journal of Materials Science, Vol. 2 No. 1, 2012, pp. 14-21. doi: 10.5923/j.materials.20120201.03.
Article Outline
1. Introduction
- The quality of moulds and dies subjected to milling is critical to the final cost of these products due to the influence of milling on subsequent finishing and polishing operations. Therefore, better quality rough and semi-finish milling operations result in shorter finishing and polishing cycles and lower manufacturing costs. Toh[1] presented a survey of the principal strategies used to optimise both productivity and surface quality when milling hardened die and mould materials at high speeds. Contour milling is the most common approach employed when roughing to achieve higher metal removal rates associated with less machining time. When finish milling, however, a number of factors must be taken into account, such as mould or die features, cutter geometry, the radial depth of cut and the cutter path strategy. Furthermore, the use of adaptive machining to maintain a consistent cutting load by changing cutting speed and feed rates may result in an improved surface finish, longer tool life and higher productivity.Nevertheless, milling forces change considerably during one rotation of a cutter due to variations in chip thickness. According to Ko et al.[2], one could expect a senoidal be haviour of the milling force components in the X and Y directions, although the dynamic complexity of the phenomenon results in a rather distinct behaviour. Altintas and Weck[3] indicated that the stability of metal cutting operations at low spindle speeds are challenging to model mainly because of the difficulty in predicting the process damping. According to Altintas and Weck, when the number of vibration waves on the machined surface during one revolution of the tooth is significant, the effective clearance angle becomes zero (or negative). Consequently, the clearance face of the tool rubs against the waves causing frictional forces against the direction of motion, which damp out chatter vibrations. Li et al.[4] report that additionally to the machining parameters, tool geometry and work material properties, the following parameters must be considered in order to accurately predict milling forces: cutting temperature variation, cutter run out, cutter and workpiece vibrations.When cavities are machined, tool deflection changes with the cutter path, especially in corners. To minimise this effect, lower width of cut values should be employed, thus diminishing the milling force components and, consequently, tool deflection. Choy and Chan[5] proposed a strategy for cutting corners when pocket milling is implemented as a module of a commercial CAD/CAM system. The path generated by the commercial software is used as input to the developed program. An improved path is then generated to progressively remove material from the corner using single or double looping motions. Ziegert et al.[6] presented a damping device capable of increasing the dynamic stiffness of a milling cutter by using internal flexible fingers. The authors claim that at high rotational speeds the centrifugal force presses the fingers against the inner wall of the cutter, resulting in a frictional force that reduces chatter vibrations.Tool deflection is considered to be the most critical factor that influences both surface finish and dimensional deviations, and for this reason, a number of researchers have addressed this subject matter. Xu et al.[7] proposed mathematical and numerical models for predicting static and dynamic deflection of the milling cutter, and according to these authors, static deflection is more relevant than the dynamic deflection. Erzurumlu and Oktem[8] compared response surface and artificial neural network methods to predict the surface finish of a mould cavity by taking into account the following milling parameters: feed rate, cutting speed, axial and radial depths of cut and required machining tolerance. Despite the fact that the artificial neural network provided slightly lower errors (2.05% error) than the surface response method ( 1.48% error), the latter method required a longer computational time (8 hours compared to a couple of seconds). Alternatively, Costes and Moreau[9] state that the roughness of milled surfaces can be predicted by measuring tool displacement using laser sensors in the X and Y directions. The maximum error (difference between predicted and measured Ra values) was found to be 12% for flank milling and 23% for end milling 27MnCr5 steel.Rao and Rao[10] studied the dimensional errors induced when milling surfaces with variable curvature; they noticed that for concave surfaces (centres of both the curvature and tool on the same side), the error tended to increase with curvature, whereas opposite results were obtained when milling convex surfaces (centre of the curvature and tool centre on opposite sides) as a consequence of respectively increasing and decreasing the force acting normally to the machined surface. Bissey-Breton et al.[11] investigated the influence of cutter geometry (rake and helix angles) on force components when milling hardened tool steel (43 HRC) with solid carbide tools. The results indicated that the milling force components tended to decrease as the rake angle was elevated; however, it appeared that the helix angle should not exceed 45–50° when cutting hardened materials to avoid an increase in the force components.The influence of the cutter design (mechanical and thermal tool fixture), feed speed and interpolation path (linear and circular) on the dimensional deviations during high-speed milling of an aluminium alloy with coated tungsten carbide ball nose end mill was investigated by Albertí et al.[12]. Not surprisingly, the results indicated that the dimensional deviations increased with feed speed, although the findings concerning the type of fixture were not conclusive (probably because the distinct machine centres were used for each tool fixture system). Tighter tolerances were obtained when a linear interpolation path was used.In the case of components with higher complexity and produced on transfer lines, the errors propagate from a station to the next one. Consequently, the error at the final station is affected by the errors in all previous stations[13]. According to the authors, the principal sources of errors/variations in a manufacturing system are: workpiece, machine tool, fixture, tool and holder, number of parallel stations operating simultaneously and gauge variation.Chen and Tzeng[14] used the Taguchi method to study the influence of milling parameters on the dimensional accuracy (based on the volumetric alteration) of a component made of two different tool steels subjected to high-speed machining. Cutting speed appeared to be the most significant factor, and at higher cutting speeds, the tolerances were wider owing to the increase in tool wear and the fact that cutting instability tends to be more significant at higher speeds. Tool material was the next most significant parameter for dimensional accuracy (due to its effect on tool wear) followed by milling direction (down-milling). The lowest helix angle promoted the tightest tolerancing, and a TiAlN coating presented the best performance compared with TiN and TiCN coatings because of its superior wear resistance.According to Dewes et al.[15], the temperature at the tool-chip interface increases with cutting speed and tool wear, although it is not dramatically affected by feed rate when milling hardened AISI H13 hot work die steel (52 HRC) with a coated carbide cutter. Similarly, Ueda et al.[16] reported that cutting temperatures increase with cutting speed and, to a lesser extent, with width of cut and feed rate. In addition, a temperature gradient of was measured during each tooth revolution. In contrast, Chen Ming et al.[17] reported results that agreed with Salomon’s model; i.e., the maximum cutting temperature was obtained at an intermediate cutting speed above which temperature tends to decrease as cutting speed is elevated. Despite the fact that the latter work was conducted using an aluminium alloy as the work material, the studies were conducted at similar spindle speed ranges of 870 to 11970 rpm[15] and 2500 to 15000 rpm[17]. In addition to the heat caused by shearing of the work material, Schmitz et al.[18] reported that heat generated by the rotation of the main spindle and travel of the axes may affect the geometric quality of the machined part during high speed machining. Schmitz et al. compared the contribution of geometric, thermal, contouring and cutting force errors on the geometric quality of a given workpiece subjected to high-speed machining under various milling conditions; they noticed that the contribution of each error source was strongly dependent on the spindle speed error and especially the cutting force error.
2. Experimental Procedure
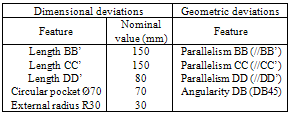
- Blanks of AISI H13 hot work die steel with initial dimensions of 160 x 160 x were used as work material. The material was supplied in two conditions: annealed with an average hardness of 170 HB and hardened (quenched and tempered) to 380 HB (41 HRC).Three cutting tool grades supplied by Sandvik Coromant with identical geometries were tested: TiCN (cermet grade CT530, equivalent to ISO grade P20/H25), WC-PVD (physical vapour deposition coated tungsten carbide grade GC1025, equivalent to ISO grade P10/H15) and WC-CVD (medium temperature chemical vapour deposition coated tungsten carbide grade GC4040, equivalent to ISO grade P40). The WC-PVD tool possessed a TiCN+TiN coating, whereas the WC-CVD tool had a TiN+TiCN+Al2O3 coating. The inserts had a geometry of R300-1032E-PM and were clamped in a milling cutter code R300-25T12-10M (diameter of and three teeth). Tables 1 and 2 show, respectively, the cutting conditions used when machining the work material in the annealed and hardened states.A sample cavity containing a variety of features, such as round, square and rectangular pockets in addition to round, square and chamfered corners, was devised. Dry ramp milling tests were conducted on a machining centre with 9 kW of power and a 7500 rpm maximum rotational speed. One cavity was machined under each cutting condition resulting in 10 test runs.In the case of the tool steel in the annealed condition (Table 1), cutting tool grades TiCN (cermet) and WC-CVD (medium temperature CVD coated tungsten carbide) were selected because these grades provided superior performance in previous tests involving tool life measurements. Furthermore, the influence of feed rate on tool life was considerably higher than that of cutting speed; therefore, the cutting speed parameter and the depth and width of cut remained constant during the tests with the annealed material. Consequently, only the influences of tool material, feed rate and milling direction were investigated in these tests.With regard to the machining conditions applied to the hardened tool steel (Table 2), tool grades WC-PVD (tungsten carbide coated by physical vapour deposition) and TiCN (cermet) were used for the same reason given above (i.e., they provided longer tool lives in previous tests). However, cutting speed had a more significant influence on tool life than feed rate, which, together with depth and width of cut, remained constant. Thus, the influence of tool material, cutting speed and milling strategy was assessed when cutting the hardened samples.
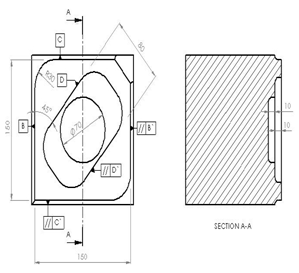 | Figure 1. Top view with selected dimensions and deviations |
|
|
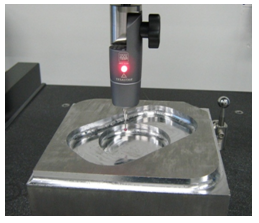 | Figure 2. Machined cavity undergoing assessment |
3. Results and Discussion
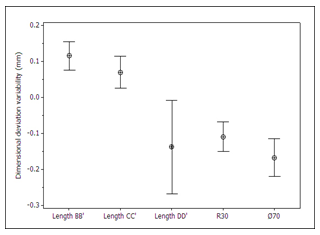
- The results are presented as plots of the main effects for each feature that was assessed. For the sake of conciseness, interaction plots are not presented in this work, although their results are discussed when necessary. Figures 3 to 5 show the main effects plots for the dimensional deviations in lengths BB’ and CC’ and external radius R30, respectively. In general, the same behaviours were observed in these three graphs, which show that the deviations were in the range of hundredths of millimetres. The deviations increased slightly with the hardness of the work material due to higher milling forces and plastic strain. Although the influence of tool grade seemed to be negligible, the interaction plots indicated that the cermet tool (TiCN) outperformed the CVD coated carbide tool (WC-CVD) when milling the annealed material and was outperformed by the PVD coated carbide tool (WC-PVD) when cutting the hardened work material. Such behaviour can be explained by the superior hardness of both the substrate and coating of the WC-PVD tool (1650 HV and 3000 HV, respectively, compared to a substrate hardness of 1490 HV for the uncoated cermet and substrate and coating hardness values of 1250 HV and 2500 HV, respectively, for the WC-CVD tool), according to Diniz et al.[19]. The effect of an increasing cutting speed must be analysed by considering the work material hardness because variable cutting test speeds of 120 and 170 m/min were used for the hardened material (380 HV) only, whereas trials using annealed specimens (170 HV) were conducted at a constant cutting speed of vc=370 m/min. However, it was observed that an increase in cutting speed promoted a reduction in the dimensional error measured on the hardened steel, which was probably due to the softening of the work material caused by the increase in the cutting zone temperature. Moreover, similar error values were obtained when milling the tool steel in the hardened state using a cutting speed of 170 m/min compared with the material in the annealed condition at vc=370 m/min. The findings related to the influence of feed rate must be discussed in a similar manner: feed rate values of 0.15 and 0.25 mm/rev/tooth were used for the annealed material, and a constant fz=0.1 mm/rev/tooth was employed when cutting the hardened specimens.However, an unexpected behaviour was recorded: the dimensional deviation was reduced as the feed rate was increased. One possible explanation may reside in the work hardening of the work material surface layers caused by shearing. In this case, a feed rate increase would result in the cutting of a portion of material ahead of the strained region, and consequently, lower milling forces and dimensional deviations would be obtained.
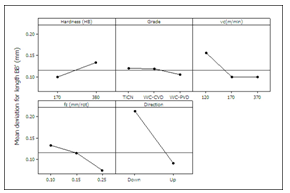 | Figure 3. Effect of cutting conditions on the dimensional deviation for length BB’ |
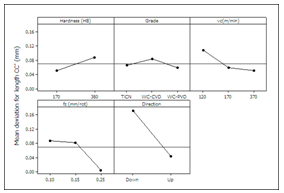 | Figure 4. Effect of cutting conditions on the dimensional deviation for length CC’ |
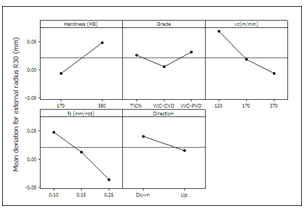 | Figure 5. Effect of cutting conditions on the external radius deviation (R30) |
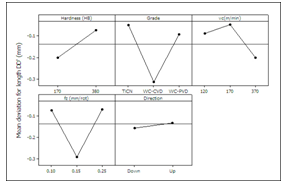 | Figure 6. Effect of cutting conditions on the dimensional deviation for length DD’ |
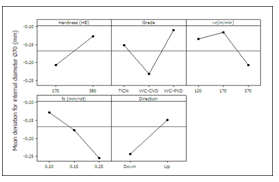 | Figure 7. Effect of cutting conditions on the diameter deviation (Ø70) |
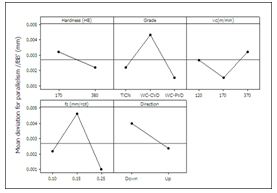 | Figure 8. Effect of the cutting conditions on //BB’ |
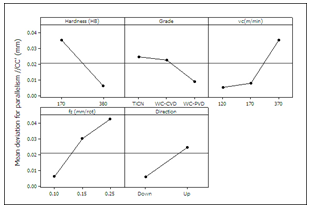 | Figure 9. Effect of the cutting conditions on //CC’ |
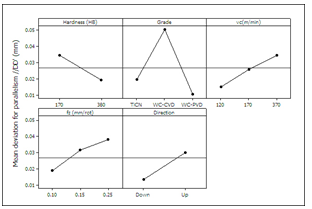 | Figure 10. Effect of the cutting conditions on //DD’ |
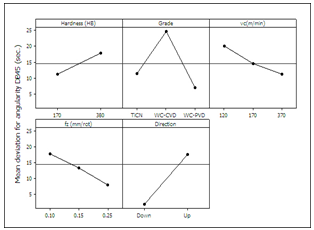 | Figure 11. Effect of cutting conditions on the angularity of DB45 |
 | Figure 12. Dimensional deviation variability |
 | Figure 13. Parallelism variability |
4. Conclusions
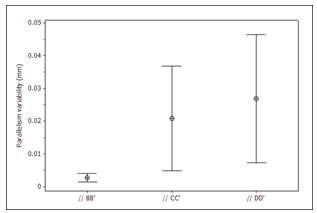
- After milling cavities in annealed (170 HV) and hardened (380 HV) AISI H13 hot work die steel using CVD and PVD coated carbide and cermet inserts under various machining parameters, the following conclusions were drawn:•The dimensional deviations obtained after milling external features (lengths BB’ and CC’ and external radius R30) were affected by the machining parameters in a similar fashion; i.e., tighter tolerances were produced when up-milling the softer material. Tool grade did not seem to drastically affect the external dimensional errors. In general, lower deviations were obtained when milling the annealed material at a feed rate of fz=0.25 mm/rot and the hardened material at a cutting speed of vc=170 m/min.•The dimensional deviations measured after the machining of internal features (length DD’ and internal diameter Ø70) showed a similar behaviour with regard to nearly all evaluated parameters: a lower error was obtained after up-milling of the hardened steel, and the cermet tool was responsible for tighter tolerances when milling the annealed steel at a feed rate of fz=0.25 mm/rot. The PVD coated tungsten carbide gave the best results for the hardened steel at a cutting speed of vc=170 m/min.•The parallelism results did not present the same level of consistency: tighter tolerances were obtained when milling the hardened tool steel in the Y direction with the PVD coated carbide tool.•Finally, the angular deviation was lower when down-milling the annealed material with the cermet tool at a feed rate of fz=0.25 mm/rot and when cutting the hardened workpiece at a cutting speed of vc=170 m/min.
ACKNOWLEDGEMENTS
- The authors would like to thank Prof. Anderson Paulo de Paiva ( of , , ) for helpful discussions concerning the statistical analysis of the results and the following Brazilian research agencies for supporting this project: CNPq, and FAPEMIG. Additional thanks go to Sandvik Coromant, Traterminas Ltd. and Villares Metals S/A for the provision of consumables.
References
| [1] | Toh, C.K., 2005, Design, evaluation and optimisation of cutter path strategies when high speed machining hardened mould and die materials, Mater. Des., 26, 517-533 |
| [2] | Ko, J.H., Yun, W.S., Cho, D.W. and Ehman, K.F., 2002, Development of a virtual machining system, part 1: approximation of the size effect for cutting force prediction, Int. J. Mach. Tools Manufact., 42, 1595-1605 |
| [3] | Altintas, Y. and Weck, M., 2004, Chatter stability of metal cutting and grinding, CIRP Annals – Manufact. Technol., 53, 619-642 |
| [4] | Li, X.P., Zheng, H.Q., Wong, Y.S. and Nee, A.Y.C., 2000, An approach to theoretical modeling and simulation of face milling forces, J. Manufact. Process., 2, 224-240 |
| [5] | Choy, H.S. and Chan, K.W., 2002, Enhanced strategy for milling corners, Proc. IMechE Part B: J. Eng. Manufact., 1135-1154 |
| [6] | Ziegert, J.C., Stanislaus, C., Schmitz, T.L. and Sterling, R., 2006, Enhanced damping in long slender end mills, J. Manufact. Process., 8, 39-46 |
| [7] | Xu, A.P., Qu, Y.X. Zhang, D.W. and Huang, T., 2003, Simulation and experimental investigation of the end milling process considering the cutter flexibility, Int. J. Mach. Tools Manufact., 43, 283-292 |
| [8] | Erzurumlu, T. and Oktem, H., 2007, Comparison of response surface model with neural network in determining the surface quality of moulded parts, Mater. Des., 28, 459-465 |
| [9] | Costes, J.P. and Moreau, V., Surface roughness prediction in milling based on tool displacements, J. Manufact. Process. (2011), doi:10.1016/j.jmapro.2011.02.003 |
| [10] | Rao, V.S. and Rao, P.V.M., 2006, Effect of workpiece curvature on cutting forces and surface error in peripheral milling, Proc. IMechE Part B: J. Eng. Manufact., 220, 1399-1407 |
| [11] | Bissey-Breton, S., Poulachon, G. and Lapujoulade, F., 2006, Integration of tool geometry in prediction of cutting forces during milling of hard materials, Proc. IMechE Part B: J. Eng. Manufact., 220, 579-587 |
| [12] | Albertí, M., Ciurana, J. and Rodriguez, C.A., 2007, Experimental analysis of dimensional error vs. cycle time in high-speed milling of aluminium alloy, Int. J. Mach. Tools Manufact., 47, 236-246 |
| [13] | Agapiou, J.S., Steinhilper, E., Gu, F. and Bandyopadhyay, P., 2003, Modeling machining errors on a transfer line to predict quality, J. Manufact. Process., 5, 1-12 |
| [14] | Chen, F.C. and Tzeng, Y.F., 2004, Optimization of the volumetric accuracy of high-speed computer numerical control milling with dynamic quality characteristics, Proc. IMechE Part B: J. Eng. Manufact., 218, 1741-1754 |
| [15] | Dewes, R.C., Ng, E., Chua, K.S., Newton, P.G. and Aspinwall, D.K. Temperature measurement when high speed machining hardened mould/die steel, J. Mater. Process. Technol. 92-93 (1999) 293-401 |
| [16] | Ueda, T., Hosokawa, A., Oda, K. and Yamada, K., 2001, Temperature on flank face of cutting tool in high speed milling, CIRP Annals – Manufact. Technol., 50, 37-40 |
| [17] | Chen Ming, Sun Fanghong, Wang Haili, Yuan Renwei, Qu Zhenghong and Zhang Shuqiao, 2003, Experimental research on the dynamic characteristics of the cutting temperature in the process of high-speed milling, J. Mater. Process. Technol., 138, 468-471 |
| [18] | Schmitz, T.L., Ziegert, J.C., Canning, J.S. and Zapata, R., 2008, Case study: A comparison of error sources in high-speed milling, Prec. Eng., 32, 126-133 |
| [19] | Diniz, A.E., Ferreira, J.R. and Silveira, J.F., 2004, Toroidal millling of hardened SAE H13 steel, J. Braz. Soc. Mech. Sci. Eng., 26, 17-21 |
| [20] | Altintas, Y., 2000, Manufacturing automation: metal cutting mechanics, machine tool vibrations, and CNC design, first ed., Cambridge University Press, New York |
 Abstract
 Reference
 Full-Text PDF
 Full-text HTML