Mei Xuan Tan, Maggie G.-Y. Pee
Science, Mathematics and Technology, Singapore University of Technology and Design (SUTD), 8 Somapah Road, Singapore
Correspondence to: Mei Xuan Tan, Science, Mathematics and Technology, Singapore University of Technology and Design (SUTD), 8 Somapah Road, Singapore.
| Email: |  |
Copyright © 2020 The Author(s). Published by Scientific & Academic Publishing.
This work is licensed under the Creative Commons Attribution International License (CC BY).
http://creativecommons.org/licenses/by/4.0/

Abstract
In this article, an electrochemistry fruit battery activity that has been modified with design thinking, cost consideration and optimization is described. This activity was done during a common core subject with Year 1 undergraduate students of various background. The students were first taught the concepts of electrochemistry and redox reactions. They were then introduced to the activity where each group of 3 to 4 students had the option to choose from different electrode pairs, different types and number of fruits and vegetables, and LED of different voltage to light up. Each item was labelled with a price and each group could obtain items up to a maximum of $10 virtual ‘budget’. The final score was affected by the voltage of the LED that was lit and the amount spent on building the fruit battery. The higher the voltage of LED and the lesser amount spent would result in a higher score. The challenges for the students in this activity include applying electrochemistry concepts to select the most appropriate electrode pair and deciding how many and which fruit or vegetable to use to achieve cost and performance optimization in building a fruit battery.
Keywords:
First-Year Undergraduate, Introductory Chemistry, Laboratory Instruction, Collaborative Learning, Hands-on Learning, Discovery Learning, Applications of Chemistry, Electrochemistry, Galvanic Cells
Cite this paper: Mei Xuan Tan, Maggie G.-Y. Pee, Electrochemistry Hands-on Activity on Fruit Battery with Cost and Design Optimization, Journal of Laboratory Chemical Education, Vol. 8 No. 3, 2020, pp. 81-89. doi: 10.5923/j.jlce.20200803.02.
1. Introduction
Electrochemistry is a core topic in science and engineering courses in universities [1]. Often introduced in Year 1 undergraduate courses, electrochemistry covers key concepts in oxidation, reduction, redox reaction and standard reduction potentials [1,2]. These are important concepts with wide ranging applications that include, but are not limited to, corrosion prevention, battery chemistry, hydrogen fuel cells and biochemical reactions [1,3].Construction of simple galvanic cells are good hands-on activities for students to apply electrochemistry concepts and learn more about battery chemistry [4,5]. Several types of galvanic cell construction activity had been described in educational literature. Some involved easy-to-assemble galvanic cell, such as the three-part galvanic cell reported by Eggen and Skaugrud [6] and electrochemistry activities focusing on the use of household items to build a battery [7,8]. Other galvanic cell activities are more elaborate with the construction of several electrochemical cells in series as described by Anariba et al [5,9] and building a high performance battery for high power devices [4,8].Fruit battery is yet another type of galvanic cell construction activity which has been commonly used to introduce the concepts of electrochemistry to young students [10–12]. Making use of the ions in fruit as electrolyte, a fruit battery is constructed with two metal electrodes plugged into the fruit [12]. The other end of the two electrodes are connected by alligator clips to a small device, often a LED, which can be lighted up due to the redox reaction taking place between the electrodes in fruit. Electrochemistry related hands-on activities or laboratory sessions at the undergraduate level are often in the form of electrolytic cell, galvanic cell construction, hydrogen fuel cell, and chemical redox reactions [3,13]. While running a common first year course at the Singapore University of Technology and Design (SUTD), we realized the need for an appropriate hands-on activity that offers more than the simplicity of a fruit battery while being less rigorous than constructing an electrochemical cell. The course is a core module for all first year undergraduates, who will later choose their major in the area of engineering, programming and architecture at SUTD. This meant that these students have varying level of understanding and appreciation of high school chemistry. In the activity described in this article, we modified the fruit battery activity to include 1) scientific thinking, 2) cost consideration and 3) optimization. At the Singapore University of Technology and Design (SUTD), all first year students are required to take a common core module that has electrochemistry as one of the topics. These students will later choose their major in the area of engineering, programming and architecture at SUTD. This meant that these students have varying level of understanding and appreciation of high school chemistry. Therefore, there is the need for an appropriate hands-on activity that offers more than the simplicity of a fruit battery while being less rigorous than constructing an electrochemical cell. In the activity described in this article, we modified the fruit battery activity to include 1) scientific thinking, 2) cost consideration and 3) optimization.
2. Method
2.1. Self-Directed Learning on Fruit Batteries
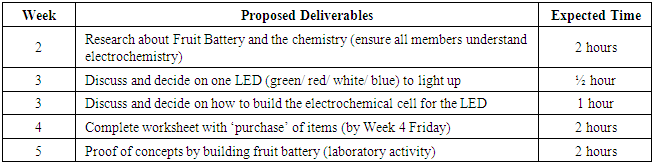
In this design activity, students were tasked to build a fruit battery that converts chemical energy to electrical energy (i.e., galvanic cell). They worked in a pre-assigned group of 3 or 4 students. The theory part of electrochemistry was introduced during lessons in Week 1. At the end of Week 1, students were introduced to this design project. The objectives and timeline (Table 1) were presented to them in a Powerpoint slide at the end of the lesson in Week 1 and a detailed write-up of design brief (Students’ Handout) was also available to the students. Based on the theory that they learned about redox reactions and electrochemistry, students had to do self-directed research about fruit battery, read up on articles online, and plan the type and number of fruit and electrodes required to find an optimal design between cost and performance before conducting the laboratory activity in week 5 as proof of concept.Table 1. Timeline and objectives for the design activity for the fruit battery (See Instructors’ Notes)
 |
| |
|
2.2. Cost and Performance Optimization
Students in each group had to discuss and plan how to build a fruit battery with the following items provided in Table 2. A maximum of $10 virtual ‘budget’ was allowed for each group.Table 2. Items available and their costs if the items are ordered in Week 4 worksheet
 |
| |
|
The total score that each group could obtain in this activity was given by the following equation: | (1) |
This activity was graded out of 20 points. The equation was formulated by the instructor based on the highest voltage of LED (blue, 4V) and the need of more than one fruit and a pair of electrodes to light up the white or blue LED. If two fruits (2 x $0.50), two pairs of electrodes (4 x $0.50), one LED ($1) and alligator clips ($1) were used, a minimum spending of $5 is needed. Based on this scenario (4V LED and $5 cost), a maximum of 20 points could be achieve using Equation 1. If a group spends a maximum of $10, they can still obtain 10 points if the fruit battery works to light up the LED. If the LED does not light up, Equation 1 will not be used for score tabulation. Rather, the group will be awarded 5 points by default for their effort. If students manage to get more than 20 points based on the setup of their fruit battery and the equation above, the extra points will be awarded as bonus points. One of the main challenges faced by the instructors in this course in prior years was that students did not do any back-of-the-envelope analysis before building their prototype. The students often took a build-and-see attitude. Therefore, in order to facilitate thought process and research before the building of fruit battery, each group was required to plan the items needed and submit their plan in a worksheet by the end of Week 4. In this worksheet, students had to sketch the schematic diagram of the fruit battery that they plan to build, identify the cathode and anode, write the redox half-reactions that they expect to take place, calculate the theoretical cell potential, list the items to be purchased and the total cost of their fruit battery. Prior to Week 5, students were not allowed to build or experiment with the fruits and electrodes. Their submission of items at the end of Week 4 would be purely based on their understanding of electrochemistry and online research done on fruit battery. In Week 5, the students proceeded to the laboratory to build the fruit battery based on the items that they had ‘purchased’. If the constructed fruit battery managed to light up the LED, instructors would check the setup of the fruit battery and assign the score to the group. If the fruit battery did not produce enough voltage to light up the LED, the group could choose to spend more money to purchase new items. Based on the rules for this activity, any additional items purchased in Week 5 during the lab session would be subjected to 25% inflation. This meant that if students find that their fruit battery did not work to light up the LED based on their ‘purchased’ items submitted in the Week 4 worksheet, students would have to troubleshoot and purchase more fruits ($0.625) or electrodes ($0.625) or LED of a lower voltage ($1.25) at a higher price than given in Table 2. All ‘purchases’ were counted to the $10 limit and used in the tabulation of their score using Equation 1. Based on the equation, students were encouraged to light up a higher voltage LED with a lower cost of the fruit battery. Thus, cost and performance optimization were required in the planning. In their respective groups, students had to meet outside of lesson time to do their own research and discuss on how to build the fruit battery to achieve the optimum score. Variables to decide on include the type and number of fruits, the type and number of metal electrodes and the color of LED for their fruit battery. It was interesting to note that some groups submitted their worksheet in week 4 with an optimization chart of how they optimized their points by varying between the LED voltage, number of electrodes and fruits. Other groups were less thorough in their analysis with just a simple calculation with no extensive optimization analysis.
2.3. Challenges and Considerations
Although we would like to encourage creativity and innovation in our students, there were some restrictions to ensure fairness in this activity. The objective was to light up one LED, preferably the higher voltage LED, with minimal cost. To keep the objective simple, only one LED was allowed in the design. Students could purchase more than one fruit to build the fruit battery, but they were not allowed to cut the fruit into smaller pieces. Similarly, students could purchase more than one pair of electrodes. They could not cut the electrodes or use the alligator clips to replace the electrodes. The alligator clips were to be use for the purpose of connecting the electrical components of the fruit battery only.If students found that the fruit battery that they had planned to build did not provide enough voltage to light up the purchased LED, they were not allowed to ‘sell’ or ‘return’ the LED that was included in their plan. Instead, the students would be required to spend more money within the $10 budget to either buy a LED with a lower voltage, or to buy more electrodes and fruits to light up their existing LED.Students were also provided with sandpaper during the activity. The purpose of sandpaper was to polish the external surface of the electrodes. This would remove the oxidized layer on the outer surface and result in better cell potential performance. However, the students were not informed of this purpose before and during the activity. Students could choose to use or not to use the sandpaper.
2.4. Materials and Precautions
The metal electrodes (METELECT6, Chemicalstore, NJ) had dimension of 5" x 1/2" x 1/32" and were stamped with 2 letter codes for identification. Voltmeter (U1230, Keysight, CA) and pH meter (SX620, Apera Instruments, Ohio) were provided to students at no cost. Based on the fruits selected in students’ worksheet in Week 4, fruits were purchased from a local grocery store the day before the first lab activity in Week 5. Used fruits were wiped with wet paper towels by the instructors and allowed to air dry after each class. At the end of each day, used fruits in good condition were kept in the fridge and reused for the subsequent classes to reduce wastage. The used electrodes were rinsed with water, dried with paper towels to be reused.The risk of electric shock in this fruit battery activity is low and no occurrences of electric shock happened during the activity with a total 112 student groups. Fruit juices that seeped out when the electrodes were inserted could be acidic and might potentially irritate the skin or eyes. Students were instructed to wear proper PPE in the teaching laboratory which included lab coat, safety googles and nitrile gloves. Students were not allowed to ingest the fruits used in this activity. Students were reminded to be cautious when inserting the electrodes into the fruits as the electrode can be quite sharp. One hand should be used to push the electrode in, and the other hand should stay out of the path of the inserted electrode while holding the fruit steadily. Any sandpapering was to be done on a cutting mat and not on the bench top.
3. Results
3.1. Student Participation
A total of 425 students in 112 groups participated in this modified fruit battery activity. When students did a quick search on the internet, they would find that lemon was one of the most common fruits used for the fruit battery [12,14]. However, if they searched further to look at scientific papers, they would find that in some studies, apple had shown to provide a higher voltage than lemon in fruit batteries with the same electrode pair used [15,16]. This difference is due to the electrolyte and ions present in the fruits.
3.2. Choice of Fruits and Electrodes
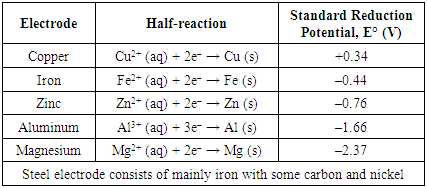
In our activity, about 60% of the groups chose potatoes, 25% chose apples, and the remaining 15% chose lemons. Interestingly, no groups chose orange, grapefruit or kiwi.The electrode pair used for the fruit battery would also affect the voltage of the fruit battery and whether it could light up the LED. Based on the Standard Reduction Potential of the metals, an electrode pair of magnesium and copper would provide the largest potential difference (Table 3). Theoretically, magnesium (anode) and copper (cathode) provided the largest potential difference if Cu2+ ions were present in the fruit. However, magnesium could react with oxygen in air to form magnesium oxide. Thus, the electrode required sandpapering right before building the fruit battery. Aluminum and copper electrode were also an option based on the Standard Reduction Potential. Similarly, aluminum could react with oxygen to form a layer of aluminum oxide. It was found that once aluminum oxidizes to Al3+ with oxygen in the air to form a layer of aluminum oxide on the electrode, it became difficult for aluminum to take part in the redox reaction in the fruit battery. The performance of the fruit battery using aluminum and copper electrodes had very low cell potential even after sandpapering the electrodes. To obtain a working fruit battery, copper and magnesium [17] were found to the best choice out of the electrodes available in Table 2. Copper and zinc [15,17] was the next best option. Table 3 was not provided to the students. They were expected to look up the standard reduction potentials on their own. Over 90% of our students chose the magnesium and copper electrode pair. There were a few groups which chose aluminum and copper, or zinc and copper. About 60% of the groups planned to build their fruit battery with two fruits and two pairs of electrodes. The rest planned for three fruits and three pairs of electrodes (Figure 1).Table 3. Standard reduction potentials of the electrodes provided
 |
| |
|
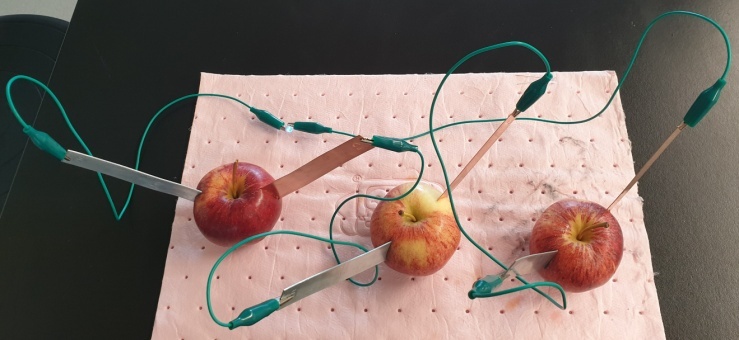 | Figure 1. An example of a fruit battery set up with three apples and three pairs of electrodes to light up a blue LED. Based on Table 2 and Equation 1, this fruit battery would cost $6.50 and scored 17 points |
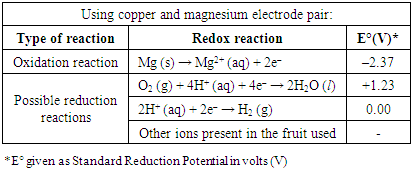
When connected, the fruit battery is expected to convert chemical energy into electrical energy (flow of electrons) via redox reaction. Using copper and magnesium as the electrode pair, magnesium would be oxidized to Mg2+ ion. The reduction reaction was not as straight forward (Table 4). Oxygen, if present at the surface of the electrode in the presence of H+, could be reduced to water. However, the most plausible reduction reaction as shown in the study by Goodisman [14] would be the reduction of H+ to hydrogen gas.Table 4. Possible oxidation and reduction reactions taking place in the fruit battery
 |
| |
|
Popular fruits/ vegetable chosen by our students include potato, apple and lemon. Most groups purchased two to three of the same fruit. A few of the groups selected to purchase only one fruit and inserted multiple pairs of electrodes into that one fruit. It was interesting to note that this setup worked for some groups but did not work for others. One possible explanation could be that the electrode pairs in those fruits that did not work were not sufficiently separated, so it was equivalent to putting the same electrode pairs in one beaker, and no cell potential was developed.
3.3. Student Performance
As noted above, the most common pair of electrodes purchased were copper and magnesium. The performance of fruit battery built with copper and magnesium electrodes improved when the metals were sandpapered and used immediately. There were a few groups with copper and aluminum electrodes, which later realized that they could not light up the LED due to the layer of aluminum oxide on the electrode. Sandpapering the aluminum electrode did not help significantly in the potential produced in the fruit battery. Those groups had to purchase a different electrode at the inflated price. Almost all groups selected blue or white LED in their plan. The activity score for the students ranged from 14 to 20 points.The time taken for students to complete this activity ranged from 30 mins to the full 150 mins allocated for the class. If the activity was completed before the end of the allocated time, students were encouraged to be creative and play around with the setup. They could experiment and plug more than one pair of electrodes in different parts of a single fruit or try to light up more than one LED connected in series. This allowed many groups to push the boundary without fearing that their grades will be affected.
3.4. Student Feedback
Overall, the students’ feedback on this activity was positive in the course survey. Some students commented that the need to read up and design the fruit battery reinforced the electrochemistry concepts that they learnt. One of the groups that chose aluminum electrode and found that the fruit battery did not work were initially disappointed, but the group discussed and came to a decision to purchase another electrode during the hands-on activity. Most of the groups managed to light up the LED, and they find it fun to apply the concepts learnt to plan how to build the fruit battery, and later build the fruit battery as a proof of concept. The activity was designed to encourage scientific thinking, build up the students’ confidence of applying conceptual knowledge through a hands-on activity, nurture teamwork and strengthen optimization as well as trouble shooting skills in the students.
3.5. Possible Modifications
Copper was the most common electrode chosen by the students although it acted as an inert electrode and did not participate in the redox reaction. A possible modification to this activity is to include the concept of supply and demand. The idea is to assign different cost to different electrodes depending on the demand among the students. This means that copper would have a higher price compared to other electrodes. This may further encourage the groups to reconsider their selections due to the high price and investigate the redox concepts more carefully. Some groups that realized that the second electrode did not participate in the redox reaction decided to purchase only one electrode in the week 4 worksheet. Instead of connecting the alligator clips to the second electrode, they inserted the clip into the fruit. This was something that the instructors did not anticipate, and the activity rules were immediately updated to prevent the use of the alligator clip as an inert electrode.Another point to take note is that the indicated LED potential values in Table 2 were not the actual value. For example, a “2V” red LED could measure in the range of 1.4 – 1.9V when measured using a multi-meter. A fixed value that was close to the actual value was used for simplicity in this activity. For future modifications, perhaps the measured value should be used for the voltage of the LED in Equation 1, and not the indicated value as given in Table 2.
4. Conclusions
Here, we describe an activity for electrochemistry that is suitable for Year 1 universities students from different majors, not just limited to Science or Engineering students. The modified fruit battery activity includes the need for scientific thinking, cost-performance consideration and optimization. This activity allows student to apply the electrochemistry concepts that they have learnt to build a fruit battery to light up a LED. This open-ended activity with no step-by-step guide or instructions encourages student to do self-directed reading on fruit battery and proof of concepts through building the fruit battery according to their plan. Overall, it offers novel way to assess the students’ electrochemistry concepts and design thinking through a common and well-known fruit battery activity.
Supporting Information
Students’ HandoutThe Students’ Handout provides the introduction and instructions (Page 1 and 2) to the hands-on activity for the students and includes a group worksheet (Page 3 and 4). The handout submitted together with this manuscript contains the original worksheet for our students, with copyright images removed.Instructors’ HandoutThe Instructors’ Handout provides information to the instructor on how they should facilitate this activity.
ACKNOWLEDGEMENTS
We would like to express sincere appreciation to the teaching team of 10.011 Introduction of Physical Chemistry and laboratory specialists at the Chemistry-Biology Teaching Lab for their dedication and hard work. We would also like to thank the 425 students who participated in this activity, all faculty and staff of Science, Math and Technology for their support, and the Office of Undergraduate Studies and SUTD for course funding.
Instructors’ Notes
Electrochemistry Hands-on Activity on Fruit Battery with Cost and Design OptimizationTimelineInstructors will introduce this 1D activity* to students at the end of Week 1, after redox reactions and electrochemical cells have been covered in class. A Powerpoint slide with the timeline, will be presented to the class and students are reminded to check eDimension for their grouping. The 1D write-up (students’ handout) will also be uploaded and available to students at the end of Week 1.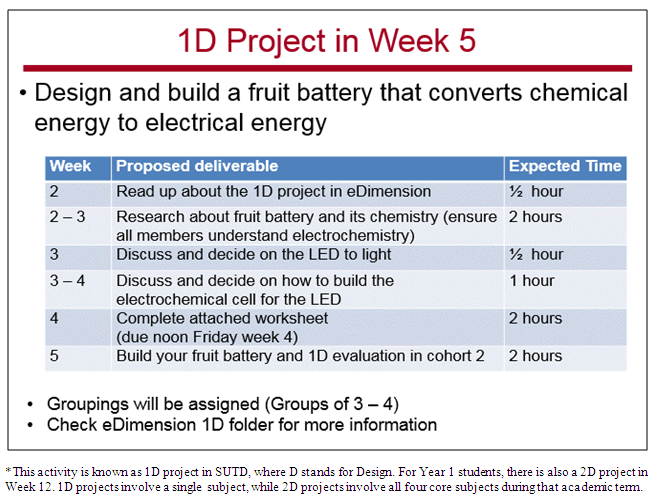 Week 2 to Week 4Instructors are to provide minimal guidance for the students for this activity. Students are expected to do self-directed learning, literature search and to read up about fruit batteries. Within their own group, students have to decide the type and number of electrodes and fruits to be used, and the LED that they will be lighting up using their constructed fruit battery in Week 5. Students are not supposed to obtain items or try to construct the fruit battery to test whether it works during this period. All groups will submit their plan and items in the worksheet by noon on Friday of Week 4.Instructors have to key in all items for each group in the ‘1D Grouping’ Excel sheet in Dropbox to keep record of the items for each group. Instructor in-charge will purchase the fruits based on the students’ requests in the worksheet.Hands-on Activity in Week 5Each bench in the lab will be assigned with the group number 1 to 12. Based on the worksheet submitted, specific items indicated by each group will be placed on the bench before the start of each lesson. The group worksheet will be returned to the students at the beginning of the activity, so that they can build to fruit battery according to their plan. Once all group members have arrived, they will start constructing the fruit battery. If the fruit battery works to light up the LED, the group has to inform the instructor. After checking the fruit battery and ensuring that the LED lights up, the instructor has to record the points in the box on the last page of the group worksheet. If the group finished the activity early, they can use the remaining time to experiment with different electrodes, different fruits or to light up more than one LED.If the fruit battery does not work to light up the LED, students in the group can discuss to purchase a LED of lower voltage, or to buy more fruits and electrodes. Items purchased during the activity in Week 5 will be subjected to 25% inflation. Instructors will have to record all extra purchases clearly in the table on the last page of the group worksheet.Collect all worksheets at the end of the activity. Grade the questions in the worksheet, compile and input all scores.Students’ Handout: Electrochemistry Hands-on Activity on Fruit Battery with Cost and Design Optimization1D Activity: Designing and Building an Electrochemical CellStudent Names: ________________________________ Cohort: ____________________Group:__________In this 1D activity, you are going to design and build a battery that converts chemical energy to electrical energy. Students will work in groups of 3-4. You will build your battery with items provided during the second cohort of week 5 to power the LED of your choice. The performance of your battery will be evaluated and graded using the rubric outline below. A total of 40 points has been assigned to this activity. Introduction: A battery is made of a chemical cell that uses oxidation-reduction (or redox) reactions resulting in the transfer of electrons spontaneously between reacting species as they combine to form products. To allow for the flow of electrons, a battery will need an anode, a cathode, a salt bridge for conducting ions, wires for conducting electrons and electrolyte.
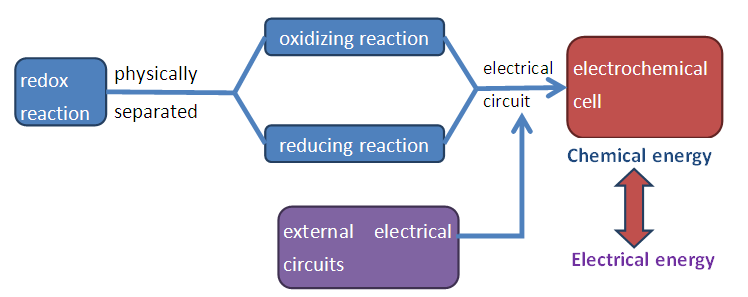 | Figure 1. Components of electrochemical cell |
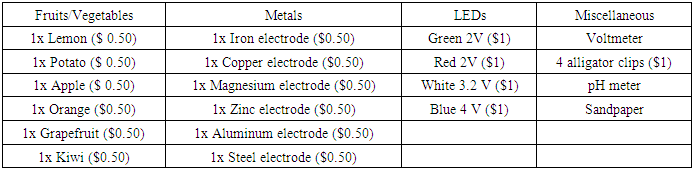
Safety: Disposable gloves, lab coat and safety goggles must be worn at all time. 3% will be deducted for 1st offense. 5% will be deducted for 2nd offense and you will receive a 0 for 1D for 3rd offense. MaterialsThe items and their prices are listed in Table 1. In week 5, inflation will hit. Each item will be 25% more expensive. Table 1. Items provided and their costs if order is placed in week 4 worksheet
 |
| |
|
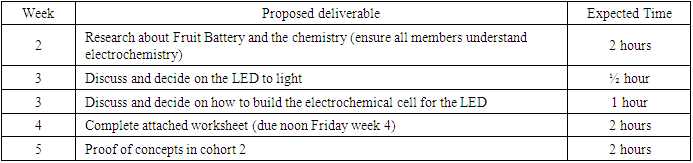
Procedure Each group will be given a credit of $10 to “purchase” the items listed above to design and build an electrochemical cell to power the LED of your choice in week 5 cohort 2 within 2 hours. In order to prepare for the activity, you will need to do some research on the potential that each fruit/vegetable and metal pair can deliver. Do note that as each fruit/vegetable is different, you should expect a range per fruit/vegetable. A timeline of the deliverable is listed below:Table 2. Timeline of 1D project
 |
| |
|
During week 5 cohort 2, your working electrochemical cell will be graded based on the formula:Points = ½ (voltage of the LED) x (10 – cost of your electrochemical cell) + 10It will be useful for the team to do an optimization to determine the best possible points you can get using the items provided. As with any device, the actual device will not deliver the theoretical potential. Such consideration should be made too. For device that does not work by the end of the cohort class, you will receive a maximum of 5 points out of the 20 points.Note: All items in Table 2 will be reused in subsequent classes. Please DO NOT cut any item. Student Names: ___________________________________ Cohort: _____________ Group #: _____________This worksheet is to be submitted by week 4 Friday noon and will be graded out of 20 points. Which LED will your group be working on in week 5? (1 point)__________________________________________________________________________________________________________________________________________________________What do you have to overcome when lighting this LED? (1 point)__________________________________________________________________________________________________________________________________________________________3) Which fruit/vegetable and metal pair will you be using? (1 point)__________________________________________________________________________________________________________________________________________________________4) Items pre-ordered (2 points)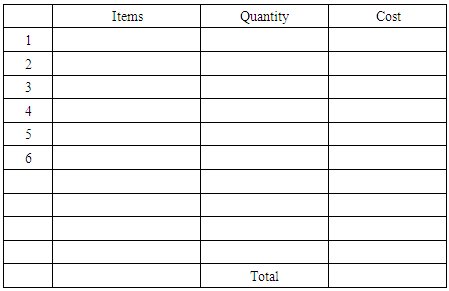 5) Sketch the schematic for your electrochemical cell and the associated circuit diagram. Show the chemical reaction (Redox) and calculation for the theoretical potential you can derive from your device. (10 points)
 6) Perform a back-of-the-envelope cost analysis showing that this is the optimized setup for the LED you have chosen. (3 points)
 7) It is unlikely that you will be able to achieve the theoretical potential. Suggest 2 reasons why. (2 points)__________________________________________________________________________________________________________________________________________________________To be completed by instructors during week 5 cohort Proof of Concept
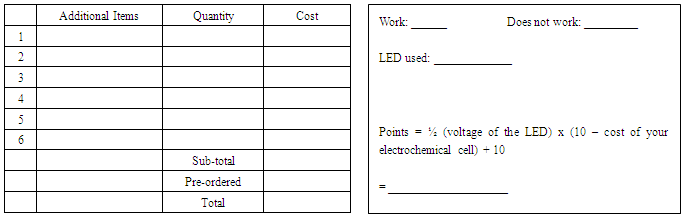
References
| [1] | Silberberg, M. S. Chemistry: The Molecular Nature of Matter and Change, Global ed.; McGraw-Hill: New York, 2013; Chapter 21, pp 850–903. |
| [2] | MIT Open Courseware, Unit IV: Transition Metals & Oxidation-Reduction Reactions https://4m.cn/loi73 (accessed Jun 2020). |
| [3] | ETH Zürich, 529-0507-00L Hands-on Electrochemistry for Energy Storage and Conversion Applications. https://4m.cn/yffBl (accessed Jun 2020). |
| [4] | Muske, K. R.; Nigh, C. W.; Weinstein, R. D. A Lemon Cell Battery for High-Power Applications. J. Chem. Educ. 2007, 84(4), 635−638. |
| [5] | Tan, S. Y.; Holtta-Otto, K.; Anariba, F. Development and Implementation of Design-Based Learning Opportunities for Students to Apply Electrochemical Principles in a Designette. J. Chem. Educ. 2019, 96(2), 256−266. |
| [6] | Eggen, P.-O.; Skaugrud, B. An Easy-To-Assemble Three-Part Galvanic Cell. J. Chem. Educ. 2015, 92(6), 1053−1055. |
| [7] | Parkes, M. A.; Chen, T.; Wu, B.; Yufit, V.; Offer, G. J. ″Can″ You Really Make a Battery Out of That? J. Chem. Educ. 2016, 93(4), 681−686. |
| [8] | Furlan, P. Y.; Krupa, T.; Naqiv, H.; Anderson, K. An Open-Ended Project: Building a High Performance, yet Simple Household Battery. J. Chem. Educ. 2013, 90(10), 1341−1345. |
| [9] | Tan, S. Y.; Chia, V. Y. Y.; Holtta-Otto, K.; Anariba, F. Teaching the Nernst Equation and Faradaic Current through the Use of a Designette: An Opportunity to Strengthen Key Electrochemical Concepts and Clarify Misconceptions. J. Chem. Educ. 2020, 97(8), 2238 – 2243. |
| [10] | Acar, B.; Tarhan, L. Effect of Cooperative Learning Strategies on Students' Understanding of Concepts in Electrochemistry. International Journal of Science and Mathematics Education. 2007, 5(2), 349–373. |
| [11] | Sesen, B. A.; Tarhan, L. Inquiry-based Laboratory Activities in Electrochemistry: High School Students’ Achievements and Attitudes. Research in Science Education. 2013, 43(1), 413–435. |
| [12] | Hunt, V.; Sorey, T.; Balandova, E.; Palmquist, B. (2010). Juan’s Dilemma: A New Twist to the Old Lemon Battery. The Science Teacher. 2010, 77(7), 52. |
| [13] | Michigan State University, LBS 172L Principles of Chemistry II – Reactivity Spring 2007, Lab 10: Redox Reactions. https://msu.edu/course/lbs/172l/Lab10-S06-Electrochemistry.pdf (accessed Jun 2020). |
| [14] | Goodisman, J. Observations on Lemon Cells. J. Chem. Educ. 2001, 78(4), 516–518. |
| [15] | Shittu, S. A.; Ajagbe, S. A.; Oloruntola, R. F. Conversion of Fruit to Battery. International Journal of Scientific & Engineering Research. 2018, 9(1), 1747–1755. |
| [16] | Ensman, R.; Hacker, T. R.; Wentwork, R. A. D. Vegetable Voltage and Fruit "Juice": An Electrochemical Demonstration. J. Chem. Educ. 1988, 65(8), 727. |
| [17] | Mr. C-Junior Cycle Science, Projects 2014-15, Chemistry Write-up. https://www.mrcjcs.com/Chemistry%20Project%20Fruit.pdf (accessed Jul 2020). |

 Abstract
 Reference
 Full-Text PDF
 Full-text HTML