-
Paper Information
- Paper Submission
-
Journal Information
- About This Journal
- Editorial Board
- Current Issue
- Archive
- Author Guidelines
- Contact Us
Journal of Laboratory Chemical Education
2015; 3(1): 12-17
doi:10.5923/j.jlce.20150301.03
Quantitative Hands-on Gas Chromatography Undergraduate Analytical Laboratory Exercise
Joshua C. Kofford, Erica Manandhar, Brian A. Logue
Department of Chemistry and Biochemistry, South Dakota State University, Brookings, United States
Correspondence to: Brian A. Logue, Department of Chemistry and Biochemistry, South Dakota State University, Brookings, United States.
| Email: |  |
Copyright © 2015 Scientific & Academic Publishing. All Rights Reserved.
Hands-on experience with analytical chemistry instrumentation is something many undergraduate students do not have an opportunity to experience, mainly due to the cost and delicate nature of the instrumentation. In this experiment, students are exposed to a realistic situation involving the entire gas chromatography process, from sample preparation through data analysis, along with the opportunity to gain individual hands-on experience with a low cost compact GC system. Additionally, the students perform chemical modification of the analyte prior to GC analysis, explore the differences between internal and external standardization, and complete a full analysis of the analytical data to include the generation of calibration curves and error estimation.
Keywords: Gas chromatography, Undergraduate, Analytical, Internal standardization
Cite this paper: Joshua C. Kofford, Erica Manandhar, Brian A. Logue, Quantitative Hands-on Gas Chromatography Undergraduate Analytical Laboratory Exercise, Journal of Laboratory Chemical Education, Vol. 3 No. 1, 2015, pp. 12-17. doi: 10.5923/j.jlce.20150301.03.
Article Outline
1. Introduction
- Undergraduate students often times do not have the opportunity for hands-on experience with many of the instruments that are commonly used in today’s modern analytical laboratory. Such instruments are often too expensive for instructional programs to have more than one or two on hand and too delicate to allow meaningful access to untrained users. Gas chromatography (GC) is one such commonly used analytical technique that is extremely powerful but is generally too expensive and delicate to allow hands-on experience for each undergraduate student in an analytical chemistry laboratory. Although delicate research grade GC instrumentation is not typically available for meaningful undergraduate student use, the percentage of published undergraduate laboratory experiments that involve GC instrumentation is highly skewed towards research-grade bench-top instruments [1-13]. There are some laboratory experiments in the primary literature that do employ alternative GC technology designed to promote hands-on use [14], but these are in the minority. The experiment presented here is a hands-on gas chromatography exercise for an undergraduate analytical chemistry or instrumental analysis laboratory course that involves the complete process of sample preparation and gas chromatography analysis, including chemical modification of the analyte, the use of an internal standard, the creation of a calibration curve, and calculation of unknown concentrations of the analyte. The experiment is presented to the students as a problem-solving exercise where they work for a hypothetical ethanol production facility and must determine possible bacterial contamination in their product. In order to determine the bacteria’s presence, the concentration of lactic acid is measured in the ethanol product as a metabolic end product of carbohydrate fermentation by the lactic acid producing bacteria. The entire lab experience is completed by each individual student using mini-GCs in two, three-hour laboratory periods and covers most aspects of instrumental analysis.
2. Laboratory Background
- During the production of bioethanol, a mixture of chemicals and plant material is produced which can become contaminated with unwanted microorganisms. This contamination slows the production of bioethanol and must be avoided by biorefineries. The microorganisms that typically contaminate ethanol production are called lactic acid bacteria (LAB; lactobacilli) [15-16]. These bacteria grow in conditions similar to those found in ethanol production and can reduce ethanol production if their growth is not controlled. LAB use plant sugars for growth, therefore, they divert the starting materials for ethanol production. Furthermore, these bacteria produce lactic and acetic acids, which also slow the fermentation process. The LAB can normally be reduced with antibiotics if their presence is detected early. LAB growth can be detected by analyzing lactic acid concentration in the ethanol produced. If lactic acid is found in the ethanol above a critical concentration, the use of antibiotics can be initiated so that efficient ethanol production can be resumed.The analysis of ethanol for lactic acid can be accomplished by GC. A schematic of a GC is shown in Figure 1 and consists of an inlet port, a column in a heated oven, a detector, and a microprocessor controller to control the GC and collect the data. GC is used to separate volatile components of samples using a carrier gas flowing through a column coated with a stationary phase. The column is contained in an oven that can be heated to create gas phase components. Because some components of the sample are more volatile than others, separation of some compounds can occur by slowly increasing the temperature of the column. After entering into the gas phase, molecules then interact with the stationary phase as they flow through the column. Different molecules interact differently with the stationary phase, such that some flow through the column faster than others.
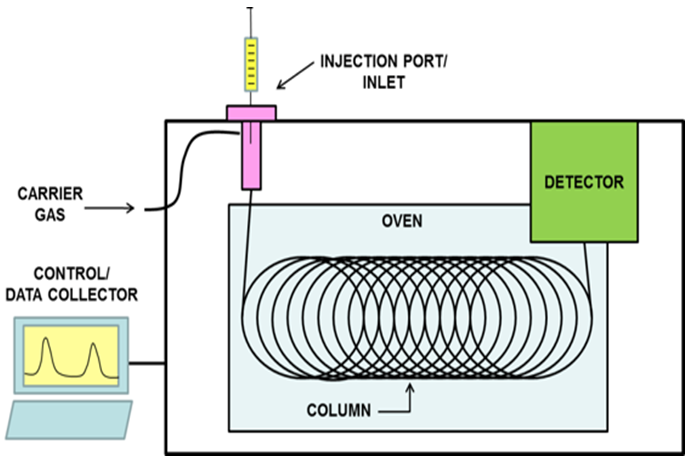 | Figure 1. Schematic of a GC system |
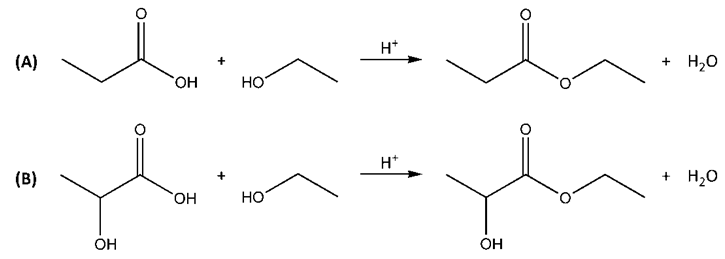 | Figure 2. The derivatization of A) lactic and B) propanoic acids with ethanol by esterification |
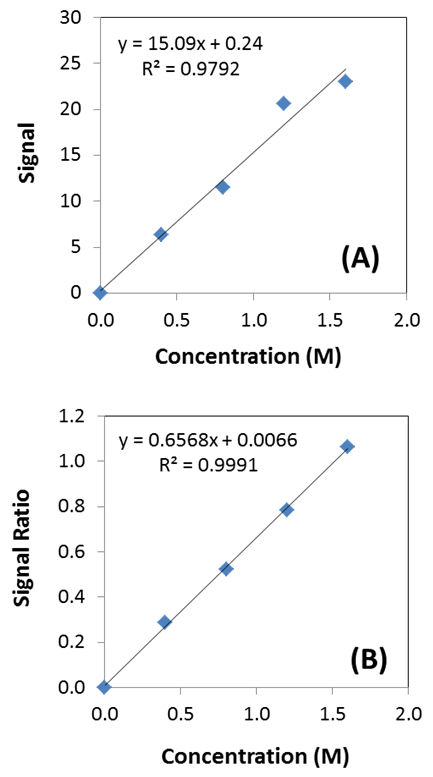 | Figure 3. Calibration curves using A) external standards and B) internal standards. The internal standards correct for a number of errors associated with an analysis to produce a better linear fit |
3. Experimental
3.1. Situation
- The student is a newly hired analytical chemist for a large bioethanol company and one of their duties requires them to monitor LAB concentrations to ensure efficient ethanol production. Analyzing LAB concentrations would be a time consuming task, but analyzing for a byproduct of the bacteria is time and cost effective. LAB produce lactic acid during ethanol production, when the bacteria ferments carbohydrates. If the concentration of lactic acid is above 500 mM, there is a harmful reduction in the efficiency of the process. Therefore, the first assignment at the student’s new job is to analyze an ethanol sample from the production line to determine the presence of LAB by quantifying the lactic acid concentration.
3.2. Materials
- Ethanol (preferably 200 proof), dichloromethane, analytical grade water, sulfuric acid, 2 mL micro-centrifuge tubes, 4 mL glass vials, and glass transfer pipettes are necessary for the laboratory. Solutions of 5 M lactic acid in ethanol, 1.5 M propionic acid in ethanol, and 0.5-1.7 M lactic acid in ethanol, as the unknown samples, must be prepared prior to the laboratory.
3.3. Instrumentation
- A Vernier Labquest and Mini-GC equipped with a Restek MXT-1 Stainless (11 meter) capillary column were used for analysis. This portable GC is operational from 30°C to 120°C, has a maximum heating ramp of 10°C/min, uses a thermal conductivity detector, and uses room air as a carrier gas.
3.4. Procedures
- The procedure below utilizes student-prepared samples and standards injected into a Mini-GC. The chromatograms produced are analyzed with Labquest software, allowing for manipulation of the chromatogram, including focusing on the peak of interest, manual selection of the area to be integrated, and calculation of the peak areas of the propionate and lactate esters. The peak areas of the analyte and of the internal standard are recorded in the student’s lab book, pooled with class data, and used to generate calibration curves based on internal and external standardization. To ensure the best results, students should immediately analyze their prepared samples. Therefore, they need to budget their time well to ensure they have time to analyze their samples in the same class period that they are prepared. If it is necessary to store the samples, students can store the samples following the CH2Cl2 extraction (see the procedure below) in tightly capped microcentrifuge tubes for up to two days. Part 1. Creating Calibration Standards and Obtaining the Unknown1. Students need to create single calibration standards of 0, 400, 800, and 1200 mM lactic acid in ethanol in microcentrifuge tubes (2 mL). They must use the micropipets to dispense the volumes necessary for the creation of these standards. (Students at this stage of their education are assumed to be able to prepare standards without explicit instructions.) Normally, calibration standards would each be prepared in triplicate. But for the sake of time, students will only prepare and analyze each concentration once. Students will submit their results to the instructor, who will combine the data with at least two others in the class to simulte replicate data.2. From the laboratory instructor, students obtain enough of the potentially contaminated ethanol solution to allow at least triplicate analysis of the unknown.Part 2. Preparation of the Ethanol Samples for GCMS AnalysisThe procedure below is for each sample and calibration standard and is written as if students are preparing and analyzing one sample. Although this is the case, it is best to prepare and analyze the samples and calibration standards in parallel. If at all possible, students should immediately analyze their prepared samples. If this is not possible, they can store the CH2Cl2 (ensuring no water is present) following the liquid-liquid extraction (see the procedure below) for up to two days in tightly capped microcentrifuge tubes. Once analysis is initiated, all samples and standards need to be analyzed on the same day with the same GC. 1. Add exactly 300 µL of the sample into a 1.5-2 mL microcentrifuge tube.2. Carefully add exactly 200 µL of propanoic acid internal standard into the tube. It is very important to add the exact amount of sample and internal standard for the analysis because after this point, the internal standard should correct for multiple errors in the analysis. 3. Add two drops of concentrated sulfuric acid to the tube in the hood and cap immediately. 4. Vortex the solution for 5 seconds.5. Place the tube into a heating block at 80°C and let samples warm for 2-3 minutes. The heating block should already be at 80°C prior to adding the samples.6. Carefully unscrew the cap in the hood in order to relieve any pressure build-up from ethanol vaporization.7. Place the reaction tube back in the heat block and heat for 1 hour at 80°C. Every 10 minutes, vortex the sample for a few seconds to mix the contents well.8. Remove from heat and let cool for 5 minutes. 9. In the hood, remove the cap, ensuring any pressure buildup is released. Transfer the entire contents of the microcentrifuge tube into a 4 mL glass vial (with open caps and septa) being careful not to spill the sample.10. Add 3 mL of pure (≥18.2 MΩ-cm) water and 400 µL CH2Cl2 to each vial. Cap the vials and vortex multiple times over a period of 1 minute. CH2Cl2 is known to be carcinogenic. Therefore, care must be taken in dispensing and transferring this solvent. All dispensing and transferring dealing with this solvent should be done in the hood. 11. Let the CH2Cl2 separate from the water for 5 minutes and then transfer approximately two-thirds of the CH2Cl2 layer in the hood to a clean 2 mL microcentrifuge tube with a Pasteur pipet and cap the tubes tightly. Part 3. Gas Chromatographic Analysis1. If not already done, plug in and turn on the Mini GC, connect the USB cable from the Mini GC to the USB port on the LabQuest, turn on the LabQuest, and start the data collection program. 2. Choose New from the File menu.3. Click the play button (
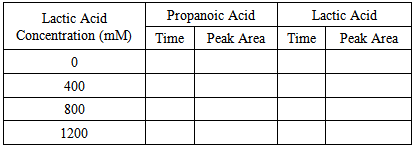
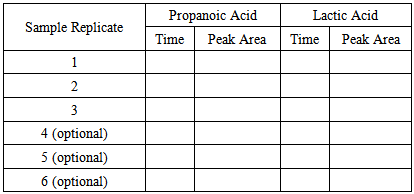
 ) in LabQuest to bring up the Temperature-Pressure profile for the Mini GC.4. Set the following values on this screen: Start temperature = 35°C, Hold time = 0 min, Ramp rate = 9°C/min, Final temperature = 80°C, Hold time = 2 min, and Pressure = 9.0 kPa. Total length should read 7.0, if not check the settings to be sure they are correct.5. Select Done. The Mini GC should start to warm up. The Mini GC is not ready for injection until the LED on the Mini GC turns green and the message on the LabQuest says “Inject and click Collect simultaneously”. When performing the analysis, it is not essential to “Inject and click Collect simultaneously” as the LabQuest program indicates. What is important is that the process of injecting and clicking Collect is consistent. In order to hit collect simultaneous to injection, the student will have to ask someone to help them with the following steps.6. Clean the syringe with ethanol by drawing ethanol into the syringe to 1/3 of its total volume and then expelling the ethanol into a paper towel. Repeat this procedure two more times. The glass syringe is fragile and can be easily damaged. Be careful not to bend the needle or plunger, or to pull the plunger out of the glass barrel. When using the syringe never pull the plunger back more than 50% of its total volume or bend the plunger when depressing it.7. Before injecting a sample into the Mini GC, charge the syringe with the sample solution to 1/3 of its total volume and then expel this solution into a paper towel. This should remove residual ethanol in the syringe.8. Draw 0.3 µL of the CH2Cl2 solution into the GC syringe. Use a lint-free wipe to gently wipe the needle from barrel to tip. 9. When the Mini GC is ready for injection, insert the syringe needle into the injection port by holding the syringe barrel with one hand and steadying the needle with the other. Insert the needle into the injection port until the needle stop (i.e., the plastic sleeve on the needle) is fully seated. If the needle doesn’t insert smoothly, rotate the needle slightly while inserting it. 10. Depress the syringe plunger, pull the needle out of the injection port, and select Collect on the LabQuest.11. The GC chromatograph will display on the Labquest similar to Figure 4 with the run number displayed on the upper right of the screen. The solvent (CH2Cl2) peak will elute first, the ethyl pentanoate (i.e., the product of esterification of the pentanoic acid internal standard with ethanol) will elute second and the analyte peak (i.e., the product of esterification of the lactic acid with ethanol) will elute last.12. As the sample is being analyzed, wash the GC syringe two times with ethanol and carefully place the syringe back in its holder. 13. When the chromatographic analysis is finished and the GC is cooling, students can analyze the data. Integrate the peaks and write down the times and areas of the peaks associated with lactic acid and the propanoic acid in Tables 1 or 2.14. Repeat the GC analysis for the other samples and calibration standards starting at Step 4 above.15. Report the peak integration data from Table 1 for the calibration standards to the laboratory instructor. Also make sure to receive the integration data of the other individuals in the “group” from the instructor.
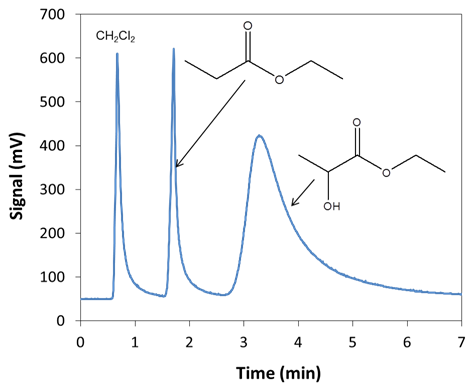 | Figure 4. Chromatogram of lactic and propanoic acids after esterification |
|
|
3.5. Data Analysis and Report Questions
- Data Analysis1. Students need to calculate the average, standard deviation, and %RSD for their sample and each of the calibration standards. They will need data from three other students to be able to do this for the calibration standards.2. A Q-test should be performed for any apparent outliers. If none of the data points appear to be an outlier then a Q-test is not necessary. 3. Students should create two calibration curves: one using the internal standard and one using only the lactic acid signal (external standardization). Each curve should be displayed in the report and the differences should be explained. 4. Students should use the calibration curve that they feel will give the most accurate concentration for lactic acid in the unknown. It is important to clearly report the concentration of the unknown with error and confidence (i.e., mean ± 95% confidence interval) and which calibration curve (i.e., external or internal standard calibration) was utilized to find this concentration. Also, students should report their conclusion as to if LAB is contaminating ethanol production. 5. At least one chromatogram should be included in the laboratory report. This should be the best one that the student gathered. Report Questions1. What are the differences between internal and external calibration? Which one worked the best for this particular analysis and why? 2. Compare the peak shapes of the lactic and propanoic acids. What factors contribute to the different peak shapes?
4. Results and Discussion
4.1. Gas Chromatography Analysis
- A typical chromatogram for the analysis of the ethyl esters of the lactic acid and propionic acid in dichloromethane is shown in Figure 4 and illustrates the retention time and peak shape differences between the solvent (CH2Cl2), internal standard (ethyl propionate), and the analyte (ethyl lactate). Students generate calibration curves using the peak areas of the analyte and the internal standard. The original lactic acid concentration in the unknown sample is then calculated using both internal and external calibration methods. Though there is tailing present for each peak (Figure 4), it does not negatively impact the results of the experiment and can be used to illustrate concepts related to unsymmetrical chromatographic peaks.
4.2. External Versus Internal Standardization
- In order to demonstrate the difference between internal and external standardization, each student generates calibration curves using the lactic acid calibration standards. Students then compare and contrast each standardization method in their laboratory report. An example of actual student generated data for internal and external standardization is shown in Figure 3. It is evident that internal standardization was the superior calibration method for the data presented here. To help focus students towards learning objectives concerning internal and external standardization, students are asked directed questions about this topic in the laboratory.
4.3. Student Learning
- Before and after students performed this experiment, a simple survey was administered in order to determine learning affected by this experiment. Though answers varied from student to student, there was a general feeling from the students that they had a better understanding of GC theory and the entire analysis process. Also, many students remarked that they gained an appreciation of the number of steps involved in an entire analytical method and that each step in the process had an impact on the final results.
5. Conclusions
- This experiment not only illustrates the theory of GC and the application of common sample preparation techniques, it also provides each student with hands-on experience with gas chromatography instrumentation. Students learn to interpret gas chromatograms, are familiarized with internal and external standardization, generate standard curves, and calculate analyte concentrations using standard analytical practices. Although this laboratory was designed for analytical chemistry courses, this experiment could be incorporated into organic, or even general chemistry courses with slight alteration. It could also be adopted for a more sophisticated bench top GC with appropriate detector if desired.
ACKNOWLEDGEMENTS
- We would like to thank South Dakota State University, the Department of Chemistry and Biochemistry, and the students of Analytical Chemistry I for their contribution to the creation of this laboratory experiment.
 Abstract
 Reference
 Full-Text PDF
 Full-text HTML